Un poco de diversión con visión por computadora y CNN con una pequeña base de datos.
, CNN, , . , , . , Spot it! ( , ).
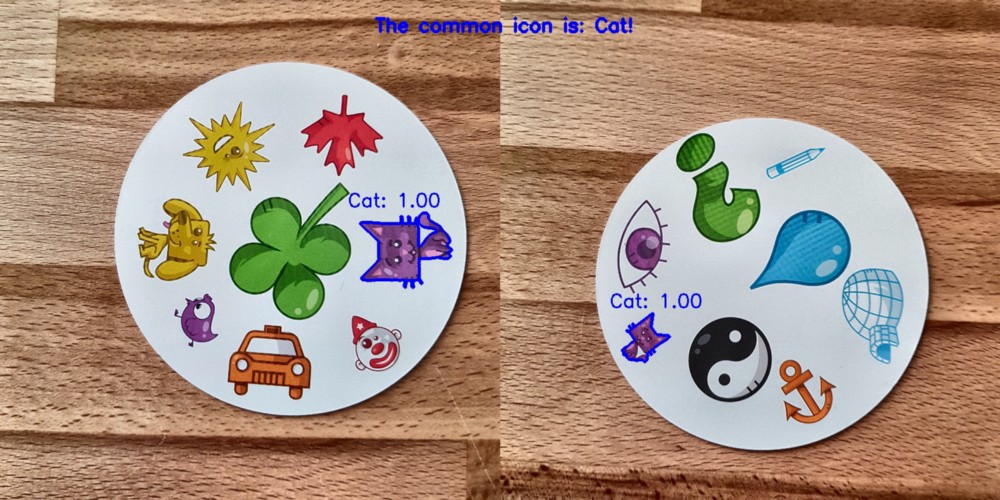
, , : , . Spot it!, . . , . 55 , , .
?
data science . , . 330 . . : (CNN)? !
, , ? , : . , . . , : , ( ) ( ) , ( ) ( ) . .
Lab . L , a , b — . OpenCV:
import cv2
import imutils
imgname = 'picture1'
image = cv2.imread(f’{imgname}.jpg’)
lab = cv2.cvtColor(image, cv2.COLOR_BGR2LAB)
l, a, b = cv2.split(lab)
, :
clahe = cv2.createCLAHE(clipLimit=3.0, tileGridSize=(8,8))
cl = clahe.apply(l)
limg = cv2.merge((cl,a,b))
final = cv2.cvtColor(limg, cv2.COLOR_LAB2BGR)
:
resized = cv2.resize(final, (800, 800))
#
cv2.imwrite(f'{imgname}processed.jpg', blurred)
!
. OpenCV. -, ( , 190), . :
image = cv2.imread(f’{imgname}processed.jpg’)
gray = cv2.cvtColor(image, cv2.COLOR_RGB2GRAY)
thresh = cv2.threshold(gray, 190, 255, cv2.THRESH_BINARY)[1]
#
cnts = cv2.findContours(thresh.copy(), cv2.RETR_EXTERNAL, cv2.CHAIN_APPROX_SIMPLE)
cnts = imutils.grab_contours(cnts)
output = image.copy()
#
for c in cnts:
cv2.drawContours(output, [c], -1, (255, 0, 0), 3)
, , : . , .
# ,
cnts = sorted(cnts, key=cv2.contourArea, reverse=True)[0]
#
mask = np.zeros(gray.shape,np.uint8)
mask = cv2.drawContours(mask, [cnts], -1, 255, cv2.FILLED)
#
fg_masked = cv2.bitwise_and(image, image, mask=mask)
# ( )
mask = cv2.bitwise_not(mask)
bk = np.full(image.shape, 255, dtype=np.uint8)
bk_masked = cv2.bitwise_and(bk, bk, mask=mask)
#
final = cv2.bitwise_or(fg_masked, bk_masked)
! , — . , . :
# ( )
gray = cv2.cvtColor(final, cv2.COLOR_RGB2GRAY)
thresh = cv2.threshold(gray, 195, 255, cv2.THRESH_BINARY)[1]
thresh = cv2.bitwise_not(thresh)
cnts = cv2.findContours(thresh.copy(), cv2.RETR_EXTERNAL, cv2.CHAIN_APPROX_SIMPLE)
cnts = imutils.grab_contours(cnts)
cnts = sorted(cnts, key=cv2.contourArea, reverse=True)[:10]
#
i = 0
for c in cnts:
if cv2.contourArea(c) > 1000:
# ,
mask = np.zeros(gray.shape, np.uint8)
mask = cv2.drawContours(mask, [c], -1, 255, cv2.FILLED)
#
fg_masked = cv2.bitwise_and(image, image, mask=mask)
mask = cv2.bitwise_not(mask)
bk = np.full(image.shape, 255, dtype=np.uint8)
bk_masked = cv2.bitwise_and(bk, bk, mask=mask)
finalcont = cv2.bitwise_or(fg_masked, bk_masked)
#
output = finalcont.copy()
x,y,w,h = cv2.boundingRect(c)
# squares io rectangles
if w < h:
x += int((w-h)/2)
w = h
else:
y += int((h-w)/2)
h = w
#
roi = finalcont[y:y+h, x:x+w]
roi = cv2.resize(roi, (400,400))
#
cv2.imwrite(f"{imgname}_icon{i}.jpg", roi)
i += 1
! . , , 57 ( 57 ). :
symbols ├── test │ ├── anchor │ ├── apple │ │ ... │ └── zebra ├── train │ ├── anchor │ ├── apple │ │ ... │ └── zebra └── validation ├── anchor ├── apple │ ... └── zebra
, ( 2500)! , GitHub. , …
(CNN)
. . softmax 57 .
:
#
from keras import layers
from keras import models
from keras import optimizers
from keras.preprocessing.image import ImageDataGenerator
import matplotlib.pyplot as plt
# , 57 ( )
model = models.Sequential()
model.add(layers.Conv2D(32, (3, 3), activation='relu', input_shape=(400, 400, 3)))
model.add(layers.MaxPooling2D((2, 2)))
model.add(layers.Conv2D(64, (3, 3), activation='relu'))
model.add(layers.MaxPooling2D((2, 2)))
model.add(layers.Conv2D(128, (3, 3), activation='relu'))
model.add(layers.MaxPooling2D((2, 2)))
model.add(layers.Conv2D(256, (3, 3), activation='relu'))
model.add(layers.MaxPooling2D((2, 2)))
model.add(layers.Conv2D(256, (3, 3), activation='relu'))
model.add(layers.MaxPooling2D((2, 2)))
model.add(layers.Conv2D(128, (3, 3), activation='relu'))
model.add(layers.Flatten())
model.add(layers.Dropout(0.5))
model.add(layers.Dense(512, activation='relu'))
model.add(layers.Dense(57, activation='softmax'))
model.compile(loss='categorical_crossentropy', optimizer=optimizers.RMSprop(lr=1e-4), metrics=['acc'])
. — . , , , . Keras:
#
train_dir = 'symbols/train'
validation_dir = 'symbols/validation'
test_dir = 'symbols/test'
# ImageDataGenerator Keras ( )
train_datagen = ImageDataGenerator(rescale=1./255, rotation_range=40, width_shift_range=0.1, height_shift_range=0.1, shear_range=0.1, zoom_range=0.1, horizontal_flip=True, vertical_flip=True)
test_datagen = ImageDataGenerator(rescale=1./255)
train_generator = train_datagen.flow_from_directory(train_dir, target_size=(400,400), batch_size=20, class_mode='categorical')
validation_generator = test_datagen.flow_from_directory(validation_dir, target_size=(400,400), batch_size=20, class_mode='categorical')
, :
, .
history = model.fit_generator(train_generator, steps_per_epoch=100, epochs=100, validation_data=validation_generator, validation_steps=50)
#
model.save('models/model.h5')
, , . :
, . ( ) . .
: . , 0,995 .
. , , , . :
- : .
( ).
. ( ).
GitHub , main.py.
:
? , ! , . ! :
? : , ! : 55 . 1485 . 140 . , !
No creo que sea realmente difícil crear un modelo 100%. Esto se puede hacer mediante el aprendizaje por transferencia, por ejemplo. Para comprender qué está haciendo el modelo, podemos renderizar las capas para la imagen de prueba. ¡Qué probar la próxima vez!
¡Espero que hayas disfrutado leer esta publicación! ❤