Formulación del problema
Haga Wi-Fi en un apartamento de más de 2 habitaciones, de modo que la velocidad en cualquier ubicación sea de al menos 90 Mbps en cualquier dispositivo móvil moderno (IEEE 802.11ac).
Suponemos que nuestro apartamento típico contiene un conjunto típico de usuarios:
- Condicional Solo un usuario (usamos YandexDNS básico)
- Abuela con miedo a Internet (YandexDNS, sin sitios fraudulentos ni virus)
- Estudiante condicional de 5 ° año que necesita Internet sin restricciones (acceso a Internet a través de VPN a Europa, DNS 8.8.8.8)
- Un colegial condicional de séptimo grado, que, por razones administrativas, necesita apagar Internet a las 21:00 de lunes a viernes y a las 22:00 los fines de semana (usamos YandexDNS "Family" y apagamos / encendimos el SSID según el horario).
Simulación de radio
Para empezar, como regla general, si el apartamento tiene paredes de concreto y el número de habitaciones es 2 o más, entonces un punto de acceso Wi-Fi no será suficiente, porque 20 Mbit / s en el sofá junto a la ventana hoy ya no nos conviene, lo que significa que el nivel mínimo de señal en el dispositivo cliente debe ser de al menos -65dB.
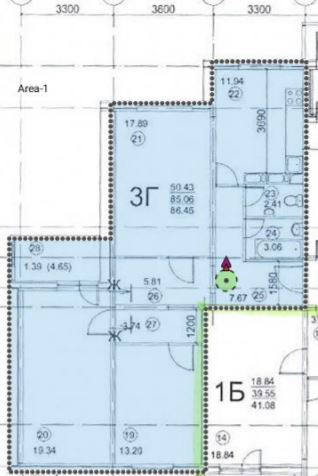
Aquí hay un ejemplo:
Ponemos un punto de acceso en el pasillo, en el rango de 5 GHz el área de cobertura hasta -65dB se ve así:
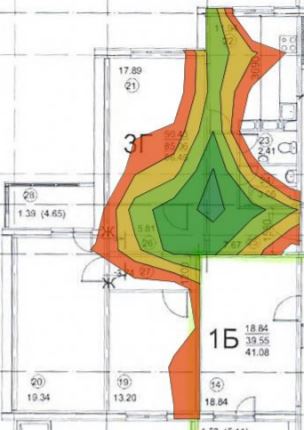
Por lo tanto, necesitamos agregar al menos 2 puntos de acceso más, obtenemos lo siguiente:
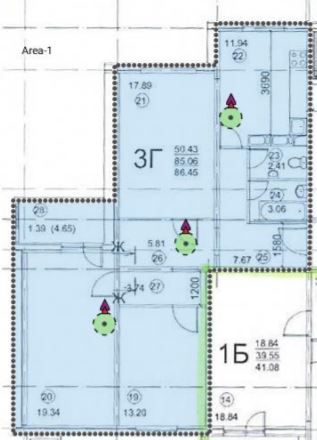


Ya está mejor, hemos decidido el número y la ubicación de los puntos de acceso.
Configuración de Wi-Fi basado en Mikrotik hAP ac
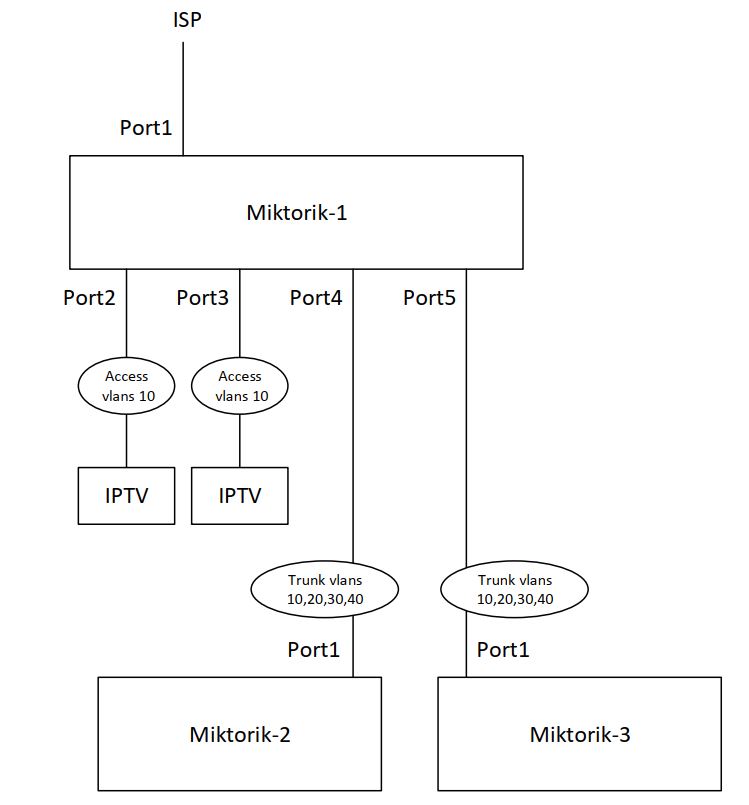
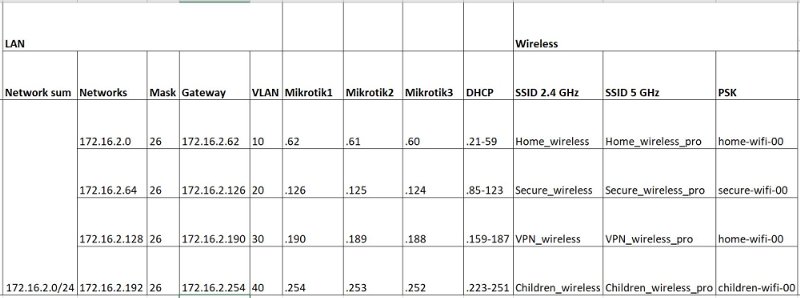
1. Diagrama de red y plan de direcciones

2. Actualización de software e instalación de paquete de soporte multicast para IPTV. Google es fácil.
3. Propongo crear 4 VLAN: 10,20,30,40, para cada tipo de usuario
/interface bridge vlan add bridge=bridge_vlan_10 tagged=VLAN_10_TRUNK_ETH5,VLAN_10_TRUNK_ETH4 vlan-ids=10 add bridge=bridge_vlan_20 tagged=VLAN_20_TRUNK_ETH5,VLAN_20_TRUNK_ETH4 vlan-ids=20 add bridge=bridge_vlan_30 tagged=VLAN_30_TRUNK_ETH5,VLAN_30_TRUNK_ETH4 vlan-ids=30 add bridge=bridge_vlan_40 tagged=VLAN_40_TRUNK_ETH5,VLAN_40_TRUNK_ETH4 vlan-ids=40 /interface vlan add interface=ether4 name=VLAN_10_TRUNK_ETH4 vlan-id=10 add interface=ether5 name=VLAN_10_TRUNK_ETH5 vlan-id=10 add interface=ether4 name=VLAN_20_TRUNK_ETH4 vlan-id=20 add interface=ether5 name=VLAN_20_TRUNK_ETH5 vlan-id=20 add interface=ether4 name=VLAN_30_TRUNK_ETH4 vlan-id=30 add interface=ether5 name=VLAN_30_TRUNK_ETH5 vlan-id=30 add interface=ether4 name=VLAN_40_TRUNK_ETH4 vlan-id=40 add interface=ether5 name=VLAN_40_TRUNK_ETH5 vlan-id=40 /interface bridge port add bridge=bridge_vlan_10 interface=ether2 pvid=10 add bridge=bridge_vlan_10 interface=ether3 pvid=10 add bridge=bridge_vlan_10 interface=wlan_2.4_GHz pvid=10 add bridge=bridge_vlan_10 interface=wlan_5_GHz pvid=10 add bridge=bridge_vlan_10 interface=VLAN_10_TRUNK_ETH5 priority=0 pvid=10 add bridge=bridge_vlan_20 interface=VLAN_20_TRUNK_ETH5 priority=0 pvid=20 add bridge=bridge_vlan_30 interface=VLAN_30_TRUNK_ETH5 priority=0 pvid=30 add bridge=bridge_vlan_40 interface=VLAN_40_TRUNK_ETH5 priority=0 pvid=40 add bridge=bridge_vlan_20 interface=wlan_2.4_GHz_virtual_2 pvid=20 add bridge=bridge_vlan_20 interface=wlan_5_GHz_virtual_2 pvid=20 add bridge=bridge_vlan_30 interface=wlan_2.4_GHz_virtual_3 pvid=30 add bridge=bridge_vlan_30 interface=wlan_5_GHz_virtual_3 pvid=30 add bridge=bridge_vlan_40 interface=wlan_2.4_GHz_virtual_4 pvid=40 add bridge=bridge_vlan_40 interface=wlan_5_GHz_virtual_4 pvid=40 add bridge=bridge_vlan_10 interface=VLAN_10_TRUNK_ETH4 priority=0 pvid=10 add bridge=bridge_vlan_20 interface=VLAN_20_TRUNK_ETH4 priority=0 pvid=20 add bridge=bridge_vlan_30 interface=VLAN_30_TRUNK_ETH4 priority=0 pvid=30 add bridge=bridge_vlan_40 interface=VLAN_40_TRUNK_ETH4 priority=0 pvid=40
4. Configure grupos para interfaces
/interface list add comment=defconf name=WAN add comment=defconf name=LAN /interface list member add list=LAN add interface=ether1 list=WAN add interface=bridge_vlan_10 list=LAN add interface=bridge_vlan_20 list=LAN add interface=bridge_vlan_30 list=LAN add interface=bridge_vlan_40 list=LAN
5. Configure las direcciones IP en las interfaces LAN. Por ejemplo, tome la red 172.16.2.0.24 y divídala en 4 partes en / 26
/ip address add address=172.16.2.126/26 interface=bridge_vlan_20 network=172.16.2.64 add address=172.16.2.190/26 interface=bridge_vlan_30 network=172.16.2.128 add address=172.16.2.254/26 interface=bridge_vlan_40 network=172.16.2.192 add address=172.16.2.62/26 interface=bridge_vlan_10 network=172.16.2.0
6. Configure la dirección IP en la interfaz WAN (si es estática)
/ip address add address=XXX.XXX.XXX.XXX/XXX interface=ether1 network=XXX.XXX.XXX.XXX
7. Establezca la ruta predeterminada hacia el proveedor
/ip route add distance=1 gateway=XXX.XXX.XXX.XXX
8. Configure el servidor DHCP
/ip pool add name=vlan_10_dhcp_pool ranges=172.16.2.21-172.16.2.59 add name=vlan_20_dhcp_pool ranges=172.16.2.85-172.16.2.123 add name=vlan_30_dhcp_pool ranges=172.16.2.159-172.16.2.187 add name=vlan_40_dhcp_pool ranges=172.16.2.223-172.16.2.251 /ip dhcp-server network add address=172.16.2.0/26 dns-server=77.88.8.8,77.88.8.1 domain=home.local gateway=172.16.2.62 netmask=26 add address=172.16.2.64/26 dns-server=77.88.8.88,77.88.8.2 domain=home.local gateway=172.16.2.126 netmask=26 add address=172.16.2.128/26 dns-server=8.8.8.8,8.8.4.4 domain=home.local gateway=172.16.2.190 netmask=26 add address=172.16.2.192/26 dns-server=77.88.8.7,77.88.8.3 domain=home.local gateway=172.16.2.254 netmask=26 /ip dhcp-server add address-pool=vlan_10_dhcp_pool disabled=no interface=bridge_vlan_10 name=dhcp_server_vlan_10 add address-pool=vlan_20_dhcp_pool disabled=no interface=bridge_vlan_20 name=dhcp_server_vlan_20 add address-pool=vlan_30_dhcp_pool disabled=no interface=bridge_vlan_30 name=dhcp_server_vlan_30 add address-pool=vlan_40_dhcp_pool disabled=no interface=bridge_vlan_40 name=dhcp_server_vlan_40
9. No se olvide del espionaje de igmp para decodificadores de IPTV
/interface bridge add igmp-snooping=yes name=bridge_vlan_10 add igmp-snooping=yes name=bridge_vlan_20 add igmp-snooping=yes name=bridge_vlan_30 add igmp-snooping=yes name=bridge_vlan_40 /routing igmp-proxy interface add alternative-subnets=0.0.0.0/0 interface=ether1 upstream=yes
10.Haga un túnel VPN a su servidor VPS para evitar bloqueos (la configuración de un servidor VPN en Debian se muestra a continuación)
/interface l2tp-client add connect-to=XXX.XXX.XXX.XXX disabled=no ipsec-secret=XXXXXXX keepalive-timeout=disabled name=l2tp-out1 password=XXXXXX profile=default use-ipsec=yes user=XXXXXX
11. Realice un enrutamiento basado en políticas para el tráfico del SSID, el tráfico desde el cual debe pasar por el túnel VPN.
/ip firewall mangle add action=mark-routing chain=prerouting new-routing-mark=VPN_route_mark passthrough=yes src-address=172.16.2.128/26 /ip route add check-gateway=ping distance=1 gateway=10.1.1.1 routing-mark=VPN_route_mark
12.Haz NAT
/ip firewall nat add action=masquerade chain=srcnat out-interface-list=WAN src-address=172.16.2.0/25 add action=masquerade chain=srcnat out-interface=l2tp-out1 src-address=172.16.2.128/26 add action=masquerade chain=srcnat out-interface-list=WAN src-address=172.16.2.192/26
13. Puede eliminar elementos innecesarios de las reglas del firewall y luego cerrar lo que desee.
/ip firewall filter add action=accept chain=input comment="defconf: accept established,related,untracked" connection-state=established,related,untracked add action=drop chain=input comment="defconf: drop invalid" connection-state=invalid disabled=yes add action=accept chain=input comment="defconf: accept ICMP" protocol=icmp add action=accept chain=input comment="defconf: accept to local loopback (for CAPsMAN)" dst-address=127.0.0.1 add action=drop chain=input comment="defconf: drop all not coming from LAN" disabled=yes in-interface-list=!LAN add action=accept chain=forward comment="defconf: accept in ipsec policy" ipsec-policy=in,ipsec add action=accept chain=forward comment="defconf: accept out ipsec policy" ipsec-policy=out,ipsec add action=fasttrack-connection chain=forward comment="defconf: fasttrack" connection-state=established,related disabled=yes add action=accept chain=forward comment="defconf: accept established,related, untracked" connection-state=established,related,untracked add action=drop chain=forward comment="defconf: drop invalid" connection-state=invalid disabled=yes add action=drop chain=forward comment="defconf: drop all from WAN not DSTNATed" connection-nat-state=!dstnat connection-state=new disabled=yes in-interface-list=WAN
14. Configure los perfiles de seguridad SSID
/interface wireless security-profiles set [ find default=yes ] supplicant-identity=MikroTik add authentication-types=wpa-psk,wpa2-psk eap-methods="" group-ciphers=tkip,aes-ccm mode=dynamic-keys name=Profile_Home_wireless supplicant-identity="" \ unicast-ciphers=tkip,aes-ccm wpa-pre-shared-key=home-wifi-00 wpa2-pre-shared-key=home-wifi-00 add authentication-types=wpa-psk,wpa2-psk eap-methods="" group-ciphers=tkip,aes-ccm mode=dynamic-keys name=Profile_Secure_wireless supplicant-identity=\ "" unicast-ciphers=tkip,aes-ccm wpa-pre-shared-key=secure-wifi-00 wpa2-pre-shared-key=secure-wifi-00 add eap-methods="" group-ciphers=tkip,aes-ccm name=Profile_Children_wireless supplicant-identity="" unicast-ciphers=tkip,aes-ccm wpa-pre-shared-key=\ children-wifi-00 wpa2-pre-shared-key=children-wifi-00
15. Configure el Wi-Fi en sí mismo con cuatro SSID
/interface wireless set [ find default-name=wlan1 ] band=2ghz-g/n country=russia distance=indoors installation=indoor mode=ap-bridge name=wlan_2.4_GHz security-profile=\ Profile_Home_wireless ssid=Home_wireless tx-power=13 tx-power-mode=all-rates-fixed vlan-id=10 wireless-protocol=802.11 wps-mode=disabled add keepalive-frames=disabled mac-address=XX:XX:XX:XX:XX:XX master-interface=wlan_2.4_GHz multicast-buffering=disabled name=wlan_2.4_GHz_virtual_2 \ security-profile=Profile_Secure_wireless ssid=Secure_wireless vlan-id=20 wds-cost-range=0 wds-default-cost=0 wps-mode=disabled add keepalive-frames=disabled mac-address=XX:XX:XX:XX:XX:XX master-interface=wlan_2.4_GHz multicast-buffering=disabled name=wlan_2.4_GHz_virtual_3 \ security-profile=Profile_Home_wireless ssid=VPN_wireless vlan-id=30 wds-cost-range=0 wds-default-cost=0 wps-mode=disabled add keepalive-frames=disabled mac-address=XX:XX:XX:XX:XX:XX master-interface=wlan_2.4_GHz multicast-buffering=disabled name=wlan_2.4_GHz_virtual_4 \ security-profile=Profile_Children_wireless ssid=Children_wireless vlan-id=40 wds-cost-range=0 wds-default-cost=0 wps-mode=disabled set [ find default-name=wlan2 ] band=5ghz-n/ac channel-width=20/40mhz-Ce country=russia distance=indoors installation=indoor mode=ap-bridge name=\ wlan_5_GHz security-profile=Profile_Home_wireless ssid=Home_wireless_pro tx-power=13 tx-power-mode=all-rates-fixed vlan-id=10 wireless-protocol=\ 802.11 add keepalive-frames=disabled mac-address=XX:XX:XX:XX:XX:XX master-interface=wlan_5_GHz multicast-buffering=disabled name=wlan_5_GHz_virtual_2 \ security-profile=Profile_Secure_wireless ssid=Secure_wireless_pro vlan-id=20 wds-cost-range=0 wds-default-cost=0 wps-mode=disabled add keepalive-frames=disabled mac-address=XX:XX:XX:XX:XX:XX master-interface=wlan_5_GHz multicast-buffering=disabled name=wlan_5_GHz_virtual_3 \ security-profile=Profile_Home_wireless ssid=VPN_wireless_pro vlan-id=30 wds-cost-range=0 wds-default-cost=0 wps-mode=disabled add keepalive-frames=disabled mac-address=XX:XX:XX:XX:XX:XX master-interface=wlan_5_GHz multicast-buffering=disabled name=wlan_5_GHz_virtual_4 \ security-profile=Profile_Children_wireless ssid=Children_wireless_pro vlan-id=40 wds-cost-range=0 wds-default-cost=0 wps-mode=disabled
16. Apague la red de "niños" en un horario:
/system scheduler add interval=1d name=Switch_OFF_children_1 on-event=swich_off_children_2.4 policy=ftp,reboot,read,write,policy,test,password,sniff,sensitive,romon \ start-date=nov/28/2020 start-time=21:00:00 add interval=1d name=Switch_ON_children_1 on-event=swich_on_children_2.4 policy=ftp,reboot,read,write,policy,test,password,sniff,sensitive,romon \ start-date=nov/28/2020 start-time=07:00:00 add interval=1d name=Switch_OFF_children_2 on-event=swich_off_children_5 policy=ftp,reboot,read,write,policy,test,password,sniff,sensitive,romon \ start-date=nov/28/2020 start-time=21:00:00 add interval=1d name=Switch_ON_children_2 on-event=swich_on_children_5 policy=ftp,reboot,read,write,policy,test,password,sniff,sensitive,romon \ start-date=nov/28/2020 start-time=07:00:00 /system script add dont-require-permissions=no name=swich_off_children_2.4 owner=admin policy=ftp,reboot,read,write,policy,test,password,sniff,sensitive,romon source=\ "interface wireless disable wlan_2.4_GHz_virtual_4" add dont-require-permissions=no name=swich_on_children_5 owner=admin policy=ftp,reboot,read,write,policy,test,password,sniff,sensitive,romon source=\ "interface wireless enable wlan_5_GHz_virtual_4" add dont-require-permissions=no name=swich_on_children_2.4 owner=admin policy=ftp,reboot,read,write,policy,test,password,sniff,sensitive,romon source=\ "interface wireless enable wlan_2.4_GHz_virtual_4" add dont-require-permissions=no name=swich_off_children_5 owner=admin policy=ftp,reboot,read,write,policy,test,password,sniff,sensitive,romon source=\ "interface wireless disable wlan_5_GHz_virtual_4"
No hay administrador de red y no se espera, por lo tanto, no usamos KID Control.
17. Deje la capacidad de configurar el enrutador localmente
/ip neighbor discovery-settings set discover-interface-list=LAN /tool mac-server set allowed-interface-list=LAN /tool mac-server mac-winbox set allowed-interface-list=LAN
18. Pequeñas cosas
/system clock set time-zone-name=Europe/Moscow /system identity set name=Miktotik-1
En Miktotik-1, Miktotik-2 hacemos todo lo mismo, solo cambiando las direcciones VLAN de acuerdo con el plan de direcciones.
Servidor VPN Debian
XXX.XXX.XXX.XXX - public IP <source>#sudo apt-get install libgmp3-dev gawk flex bison make #sudo wget https://download.openswan.org/openswan/openswan-latest.tar.gz #sudo tar -xvzf openswan-latest.tar.gz #cd openswan-2.6.51 #sudo make programs #sudo make install #sudo nano /etc/ipsec.conf config setup nat_traversal=yes virtual_private=%v4:10.0.0.0/8,%v4:192.168.0.0/16,%v4:172.16.0.0/12 oe=off protostack=netkey conn L2TP-PSK-NAT rightsubnet=vhost:%priv also=L2TP-PSK-noNAT conn L2TP-PSK-noNAT authby=secret pfs=no auto=add keyingtries=3 rekey=no ikelifetime=8h keylife=1h type=transport left=XXX.XXX.XXX.XXX leftprotoport=17/1701 right=%any rightprotoport=17/%any #sudo nano /etc/ipsec.secrets XXX.XXX.XXX.XXX %any: PSK "PASSWORD" #sudo nano /root/ipsec #sudo iptables --table nat --append POSTROUTING --jump MASQUERADE #sudo echo 1 > /proc/sys/net/ipv4/ip_forward #for each in /proc/sys/net/ipv4/conf/* #do #echo 0 > $each/accept_redirects #echo 0 > $each/send_redirects #done #sudo /etc/init.d/ipsec restar #sudo chmod +x /root/ipsec #sudo sh /root/ipsec #sudo nano /etc/xl2tpd/xl2tpd.conf [global] port = 1701 ipsec saref = yes saref refinfo = 30 [lns default] ip range = 10.1.1.2-10.1.1.100 local ip = 10.1.1.1 refuse chap = yes refuse pap = yes require authentication = yes ppp debug = yes pppoptfile = /etc/ppp/options.xl2tpd length bit = yes name = VPN-1 #sudo nano /etc/ppp/options.xl2tpd require-mschap-v2 ms-dns 8.8.8.8 ms-dns 8.8.4.4 asyncmap 0 auth crtscts lock hide-password modem debug name VPN-1 proxyarp lcp-echo-interval 30 lcp-echo-failure 4 #sudo nano /var/log/syslog #sudo nano /etc/ppp/chap-secrets user-1 VPN-1 PASSWORD * #sudo /etc/init.d/ipsec restart sudo /etc/init.d/xl2tpd restart #sudo ipsec verify FIREWALL #sudo apt-get install ufw #sudo ufw disable #sudo ufw allow ssh #sudo ufw allow 500/udp #sudo ufw allow 1701/udp #sudo ufw allow 4500/udp #sudo ufw allow from 10.1.1.0/24 #sudo ufw default allow routed #sudo ufw delete ssh #sudo ufw allow 4444 #sudo ufw enable
Ver estado de firmware
#sudo ufw status verbose
Ver registros si algo está bloqueado
#sudo ufw logging low #sudo tail -f /var/log/ufw.log
Deshabilite el registro para no obstruir el espacio en disco
#sudo ufw logging off
Cambiar el puerto ssh a otro
sudo nano /etc/ssh/sshd_config Port 4444 sudo systemctl restart sshd
Comprobando intentos de piratería
sudo cat /var/log/auth.log | grep "authentication failure"
¡Hecho!
¡Ahora el servidor VPN funcionará incluso con iPhone a través de 4G! Y como una buena adición, habrá acceso a todos los enrutadores Mikrotik a través de SSH desde un servidor VPS.