
¡Hola! En el post anterior os hablé del motor Armory, ahora crearemos nuestro primer nivel en él. De hecho, crear niveles en Armory no es prácticamente diferente de trabajar en el mismo Unreal o Unity: también puedes importar activos, crear los tuyos allí mismo (¡esto es Blender!), Aplicar texturas y otras cosas. Como mencioné, para trabajar con el motor, necesitas un don para trabajar con Blender, ya que Armory está estrechamente relacionado con él. No entraré en detalles sobre cómo agregar un avión, cubo o lámpara a la escena, solo trabajar con el motor. Listo? Empecemos entonces.
En primer lugar, puede descargar un archivo de plantilla listo para usar , en función del cual analizaremos qué funciona y cómo. En el archivo, necesitamos playground.blend. Hacemos clic y corremos. Ahora veamos qué opciones de lanzamiento tenemos.
Armory Player:
Runtime:
Krom .
Browser .
Camera:
Scene .
Viewport, . , .
.
Cube, Cylinder, Ground, Lamp, Wall, Lamp (spot) . (grid_base, grid _rough), . ? .
, , - , , , , F . - Blender. .
, Timeline 1, , I - Rotation . 60 . , R I - Rotation . .
(Cube), Physics Rigid Body. Collision.

Rigid Body :
Active , .
Passive .

Light, Spot. .
Shader Editor - World. - HDR .
, . Logic Node - blueprints Unreal Engine 4. . Haxe / .
5 :
Events - .
Actions - (events) .
Logic - , , , …
Variables - .
Values - .
. Logic Editor - New . Shift - A.
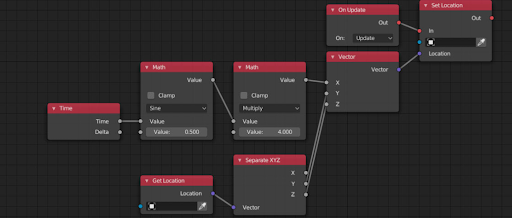
On Update . .
In Set Object Location . Object , , . .
( In Out) . , ( ). ( ) .
Vector Location Set Object Location . .
X, Math Sine.
Math ( ).
Y Z , . Get Object Location, Separate XYZ , XYZ, Y Z Y / Z Vector , .
Armory Project > Flags > Debug Console.
Haxe
“F” Haxe. , , (Rigid Body Active). Empty, - . Haxe traits Properties - Object - Armory Traits. New Script. Kode Studio - .
package arm;

import iron.object.Object;
import iron.system.Input;
import iron.Scene;
import armory.trait.physics.RigidBody;

class SpawnBox extends iron.Trait {
	public function new() {
		super();
		// We want to get notified every frame
		notifyOnUpdate(update);
	}

	function update() {
		// f key was pressed
		if (Input.getKeyboard().started("f")) {
			// Spawn Box object
			Scene.active.spawnObject("Box", null, boxSpawned);
		}
	}

	// Box just got spawned
	function boxSpawned(o:Object) {
		// Translate cube to the location of empty object
		var traitOwner = object;
		o.transform.loc.setFrom(traitOwner.transform.loc);
		// Box object has a rigid body trait
		// Notify physics system to take new location into effect!
		o.getTrait(RigidBody).syncTransform();
	}
}
Armory . traits. PhysicsDrag traits. traits .
Armory UI

- Armory UI. UI, Scene, traits UI Armory Traits. New Canvas Edit Canvas - . Armor UI Text . Properties. .

rmory , Render - Armory Render Path . .

Construir y publicar nuestro proyecto se encuentra en Propiedades - Render - Armory Exporter. Puede realizar varios ajustes preestablecidos de exportación, y en cada uno puede especificar la plataforma, API, ruta y escena para iniciar. Seleccione la plataforma requerida (por ejemplo, Windows) y haga clic en Publicar. Los archivos exportados y recopilados se pueden ver haciendo clic en el triángulo (resaltado en rojo) - Abrir carpeta.