Con qué frecuencia, al desarrollar firmware para un microcontrolador, durante la depuración, cuando los bytes no se ejecutan en la UART, exclama: “¡Ahh, exactamente! ¡No habilitó el reloj! " O, cuando cambió la pata del LED, ¿se olvidó de "aplicar energía" al nuevo puerto? Muy a menudo, creo. Yo, al menos, seguro.
A primera vista, podría parecer que controlar la sincronización de la periferia es trivial: escribió 1 - habilitado, 0 - deshabilitado.
Pero "simple" no siempre es efectivo ...
Formulación del problema
Antes de escribir el código, es necesario determinar los criterios por los que se puede evaluar. En el caso del sistema de reloj periférico del controlador, la lista puede verse así:
- En los sistemas embebidos, uno de los criterios más importantes es el código resultante más pequeño posible, ejecutado en el menor tiempo posible.
- . - code review , /
- , ,
- ( )
Después de aclarar los criterios de evaluación, estableceremos una tarea específica, en el camino definiendo las condiciones y el "entorno" para la implementación:
Compilador: GCC 10.1.1 + Make
Lenguaje: C ++ 17
Entorno: Visual Studio Code
Controller: stm32f103c8t6 (cortex-m3)
Tarea: habilitar el reloj SPI2, USART1 (ambas interfaces que usan DMA)
La elección de este controlador se debe, por supuesto, a su prevalencia, especialmente gracias a una de las artesanías populares chinas: la producción de tableros Blue Pill.

Desde el punto de vista de la ideología, no importa qué controlador se elija: stmf1, stmf4 o lpc, ya que Trabajar con el sistema de reloj periférico se reduce solo a escribir en un bit determinado, ya sea 0 para apagar o 1 para encender.
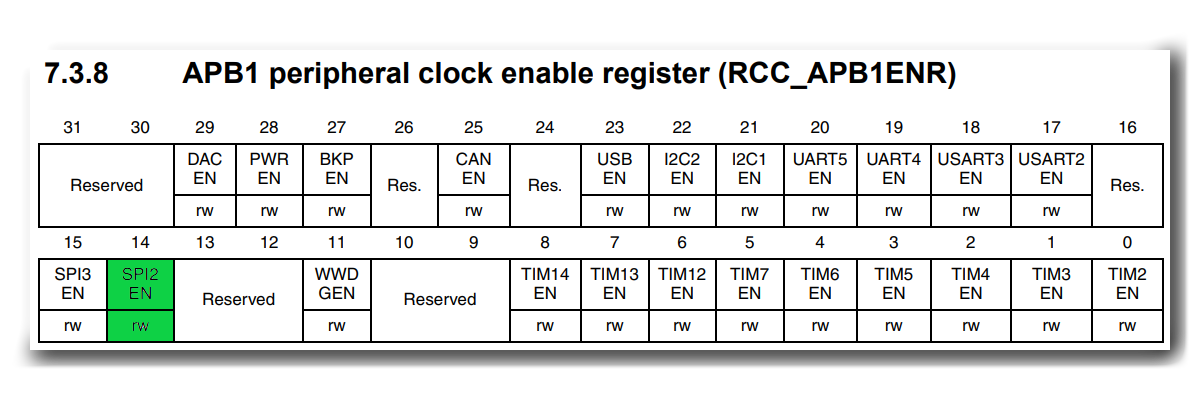
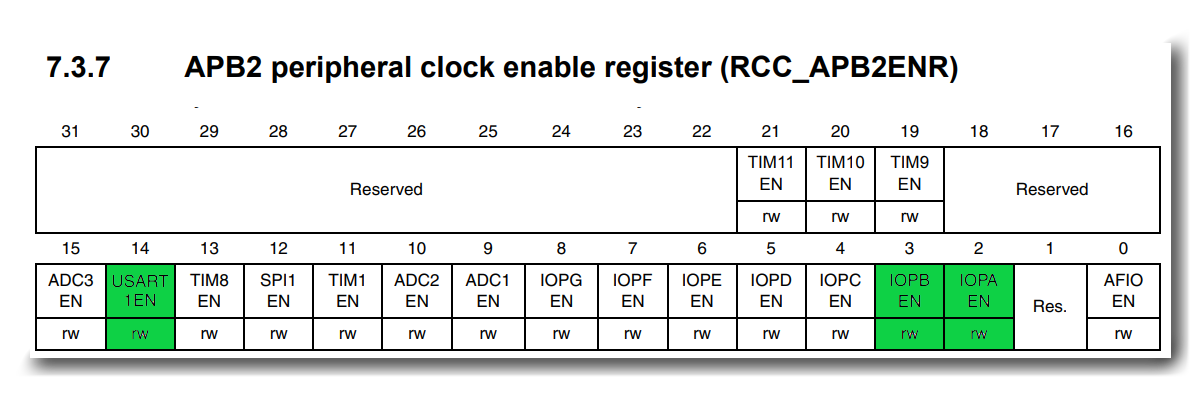
En stm32f103c8t6 existen 3 registros que se encargan de habilitar el reloj periférico: AHBENR, APB1ENR, APB2ENR.
Las interfaces de hardware para la transferencia de datos SPI2 y USART1 no fueron elegidas por casualidad, porque para su pleno funcionamiento es necesario habilitar los bits de reloj ubicados en todos los registros enumerados: los bits de las interfaces en sí, DMA1, así como los bits de los puertos de entrada-salida (GPIOB para SPI2 y GPIOA para USART1).
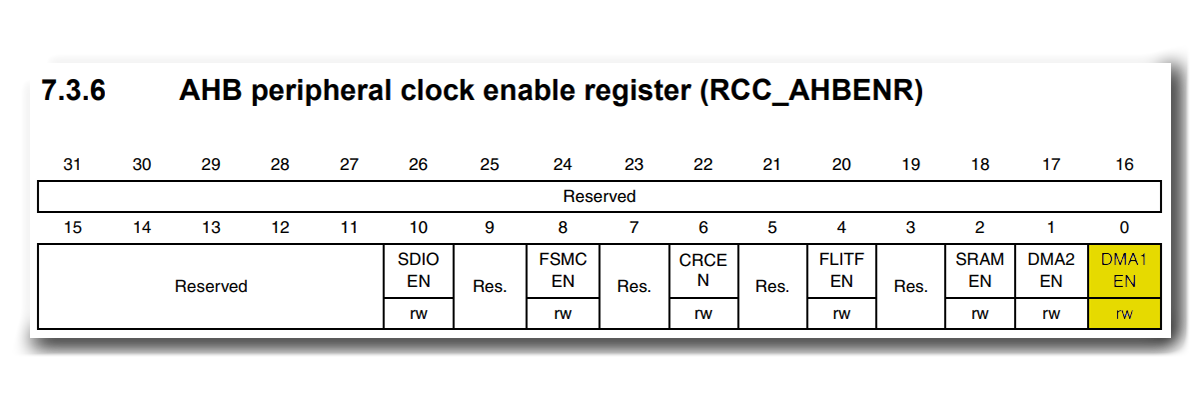
Cabe señalar que para un rendimiento óptimo con el reloj, es necesario tener en cuenta que AHBENR contiene un recurso compartido que se utiliza para el funcionamiento de SPI2 y USART1. Es decir, deshabilitar DMA conducirá inmediatamente a la inoperabilidad de ambas interfaces, al mismo tiempo, la eficiencia de reenganche ni siquiera será cero, sino negativa, porque esta operación ocupará la memoria del programa y dará lugar a un consumo de reloj adicional para leer-modificar-escribir un registro volátil.
Habiendo abordado los objetivos, las condiciones y las características del problema, pasemos a buscar soluciones.
Enfoques básicos
Esta sección contiene formas típicas de habilitar la sincronización de periféricos con las que me he encontrado y, seguro, también las ha visto y / o usado. Desde los más simples, implementados en C, hasta plegar la expresión de C ++ 17. Se consideran sus ventajas y desventajas inherentes.
Si desea ir directamente a la metaprogramación, puede omitir esta sección y pasar a la siguiente .
Escritura directa a registros
La forma clásica "disponible lista para usar" tanto para C como para C ++. El proveedor, con mayor frecuencia, proporciona archivos de encabezado para el controlador, en los que todos los registros y sus bits están predeterminados, lo que permite comenzar a trabajar de inmediato con los periféricos:
int main(){
  RCC->AHBENR  |= RCC_AHBENR_DMA1EN;
  RCC->APB2ENR |= RCC_APB2ENR_IOPAEN
               |  RCC_APB2ENR_IOPBEN
               |  RCC_APB2ENR_USART1EN;
  RCC->APB2ENR |= RCC_APB1ENR_SPI2EN;
…
}
Listado
    // AHBENR( DMA1)
  ldr     r3, .L3
  ldr     r2, [r3, #20]
  orr     r2, r2, #1
  str     r2, [r3, #20]
    // APB2ENR( GPIOA, GPIOB, USART1)
  ldr     r2, [r3, #24]
  orr     r2, r2, #16384
  orr     r2, r2, #12
  str     r2, [r3, #24]
    // APB1ENR( SPI2)
  ldr     r2, [r3, #28]
  orr     r2, r2, #16384
  str     r2, [r3, #28]
Tamaño del código: 36 bytes. Ver
ventajas:
- Tamaño mínimo de código y velocidad de ejecución
- La forma más fácil y obvia
Desventajas:
- Es necesario recordar los nombres de los registros y los nombres de los bits, o consultar constantemente el manual
- Es fácil cometer un error en su código. El lector debe haber notado que en lugar de SPI2, se volvió a habilitar USART1.
- Para que funcionen algunas unidades periféricas, también debe habilitar otros periféricos, como GPIO y DMA para las interfaces
- Falta total de portabilidad. Al elegir un controlador diferente, este código pierde su significado
Con todas las deficiencias, este método sigue siendo muy popular, al menos cuando necesitas "sentir" el nuevo controlador
Funciones de inicialización
Intentemos abstraer y ocultar el trabajo con registros al usuario. Y una función C ordinaria nos ayudará con esto:
void UART1_Init(){
 RCC->AHBENR  |= RCC_AHBENR_DMA1EN;
 RCC->APB2ENR |= RCC_APB2ENR_IOPAEN
              |  RCC_APB2ENR_USART1EN;
  //
}

void SPI2_Init(){
 RCC->AHBENR  |= RCC_AHBENR_DMA1EN;
 RCC->APB2ENR |= RCC_APB2ENR_IOPBEN;
 RCC->APB1ENR |= RCC_APB1ENR_SPI2EN;
  //
}

int main(){
  UART1_Init();
  SPI2_Init();
…
}
Tamaño del código: 72 bytes. Mira
Listado
UART1_Init():
    // AHBENR( DMA1)
  ldr     r2, .L2
  ldr     r3, [r2, #20]
  orr     r3, r3, #1
  str     r3, [r2, #20]
    // APB2ENR( GPIOA, USART1)
  ldr     r3, [r2, #24]
  orr     r3, r3, #16384
  orr     r3, r3, #4
  str     r3, [r2, #24]
  bx      lr
SPI2_Init():
    // (!) AHBENR( DMA1)
  ldr     r3, .L5
  ldr     r2, [r3, #20]
  orr     r2, r2, #1
  str     r2, [r3, #20]
    // (!) APB2ENR( GPIOB)
  ldr     r2, [r3, #24]
  orr     r2, r2, #8
  str     r2, [r3, #24]
    //  APB1ENR( SPI2)
  ldr     r2, [r3, #28]
  orr     r2, r2, #16384
  str     r2, [r3, #28]
  bx      lr
main:
   push    {r3, lr}
   bl      UART1_Init()
   bl      SPI2_Init()
Pros:
- No es necesario consultar el manual para cada ocasión.
- Los errores se localizan en la etapa de escritura de un controlador periférico
- El código personalizado es fácil de leer
Desventajas:
- El número de instrucciones requeridas se ha multiplicado por el número de periféricos implicados.
- Mucha duplicación de código: para cada número UART y SPI, será prácticamente idéntico
Aunque nos deshicimos de la escritura directa en registros en el código de usuario, ¿a qué costo? El tamaño de memoria requerido y el tiempo de ejecución para encender se han duplicado y continuarán creciendo, con más periféricos involucrados.
Función de activación del reloj
Envuelva la modificación de los relojes en una función separada, asumiendo que esto reducirá la cantidad de memoria requerida. Al mismo tiempo, introduciremos un parámetro de identificación para los periféricos, para reducir el código del controlador:
void PowerEnable(uint32_t ahb, uint32_t apb2, uint32_t apb1){
    RCC->AHBENR  |= ahb;
    RCC->APB2ENR |= apb2;
    RCC->APB1ENR |= apb1;
}

void UART_Init(int identifier){
    uint32_t ahb = RCC_AHBENR_DMA1EN, apb1 = 0U, apb2 = 0U;
    if (identifier == 1){
      apb2 = RCC_APB2ENR_IOPAEN | RCC_APB2ENR_USART1EN;
    }
    else if (identifier == 2){…}
    PowerEnable(ahb, apb2, apb1);
  //
}

void SPI_Init(int identifier){
    uint32_t ahb = RCC_AHBENR_DMA1EN, apb1 = 0U, apb2 = 0U;
    if (identifier == 1){…}
    else if (identifier == 2){
      apb2 = RCC_APB2ENR_IOPBEN;
      apb1 = RCC_APB1ENR_SPI2EN;
    }
    PowerEnable(ahb, apb2, apb1);
  //
}

int main(){
  UART_Init(1);
  SPI_Init(2);
…
}
Tamaño del código: 92 bytes. Mira
Listado
PowerEnable(unsigned long, unsigned long, unsigned long):
  push    {r4}
  ldr     r3, .L3
  ldr     r4, [r3, #20]
  orrs    r4, r4, r0
  str     r4, [r3, #20]
  ldr     r0, [r3, #24]
  orrs    r0, r0, r1
  str     r0, [r3, #24]
  ldr     r1, [r3, #28]
  orrs    r1, r1, r2
  str     r1, [r3, #28]
  pop     {r4}
  bx      lr
UART_Init(int):
  push    {r3, lr}
  cmp     r0, #1
  mov     r2, #0
  movw    r1, #16388
  it      ne
  movne   r1, r2
  movs    r0, #1
  bl      PowerEnable(unsigned long, unsigned long, unsigned long)
  pop     {r3, pc}
SPI_Init(int):
  push    {r3, lr}
  cmp     r0, #2
  ittee   eq
  moveq   r1, #8
  moveq   r1, #16384
  movne   r1, #0
  movne   r2, r1
  movs    r0, #1
  bl      PowerEnable(unsigned long, unsigned long, unsigned long)
  pop     {r3, pc}
main:
   push    {r3, lr}
   movs    r0, #1
   bl      UART_Init(int)
   movs    r0, #2
   bl      SPI_Init(int)
Pros:
- Fue posible acortar el código de descripción de los controladores del microcontrolador.
- El número resultante de instrucciones disminuyó *
Desventajas:
- Mayor tiempo de ejecución
* Sí, en este caso el tamaño del código ejecutable ha aumentado respecto a la versión anterior, pero esto se debe a la aparición de operadores condicionales, cuya influencia se puede neutralizar si se utilizan al menos 2 copias de cada tipo de periferia.
Porque la función de inclusión toma parámetros, luego aparecen operaciones de pila en el ensamblador, lo que también afecta negativamente al rendimiento.
En este punto, creo que vale la pena mover
Propiedades y plantillas de valor
Comenzando a considerar el enfoque positivo, saltaremos inmediatamente la opción de incluir el reloj en el constructor de la clase, ya que este método en realidad no es diferente de las funciones de inicialización de estilo C.
Dado que en el momento de la compilación conocemos todos los valores que deben escribirse en los registros, nos desharemos de las operaciones de pila. Para hacer esto, crearemos una clase separada con un método de plantilla, y dotaremos a las clases periféricas de propiedades (rasgo de valor) que almacenarán valores para los registros correspondientes.
struct Power{
template< uint32_t valueAHBENR, uint32_t valueAPB2ENR, uint32_t valueAPB1ENR>
    static void Enable(){
//   = 0,
        if constexpr (valueAHBENR)
            RCC->AHBENR |= valueAHBENR;
        if constexpr (valueAPB2ENR)
            RCC->APB2ENR |= valueAPB2ENR;
        if constexpr (valueAPB1ENR)
            RCC->APB1ENR |= valueAPB1ENR;
    };

};

template<auto identifier>
struct UART{
//   identifier
  static constexpr auto valueAHBENR = RCC_AHBENR_DMA1EN;
  static constexpr auto valueAPB1ENR = identifier == 1 ? 0U : RCC_APB1ENR_USART2EN;
  static constexpr auto valueAPB2ENR = RCC_APB2ENR_IOPAEN
                                    |  (identifier == 1 ? RCC_APB2ENR_USART1EN : 0U);
    //
};

template<auto identifier>
struct SPI{
  static constexpr auto valueAHBENR = RCC_AHBENR_DMA1EN;
  static constexpr auto valueAPB1ENR = identifier == 1 ? 0U : RCC_APB1ENR_SPI2EN;
  static constexpr auto valueAPB2ENR = RCC_APB2ENR_IOPBEN
                                    |  (identifier == 1 ? RCC_APB2ENR_SPI1EN : 0U);
    //
};

int main(){
    //
  using uart = UART<1>;
  using spi = SPI<2>;

  Power::Enable<
                uart::valueAHBENR  | spi::valueAHBENR,
                uart::valueAPB2ENR | spi::valueAPB2ENR,
                uart::valueAPB1ENR | spi::valueAPB1ENR
                >();
…
}
Tamaño del código: 36 bytes. Mira
Listado
main:
    // AHBENR( DMA1)
  ldr     r3, .L3
  ldr     r2, [r3, #20]
  orr     r2, r2, #1
  str     r2, [r3, #20]
    // APB2ENR( GPIOA, GPIOB, USART1)
  ldr     r2, [r3, #24]
  orr     r2, r2, #16384
  orr     r2, r2, #12
  str     r2, [r3, #24]
    // APB1ENR( SPI2)
  ldr     r2, [r3, #28]
  orr     r2, r2, #16384
  str     r2, [r3, #28]
Pros:
- El tamaño y el tiempo de ejecución resultaron ser los mismos que en la versión de referencia con escritura directa a registros.
- Es bastante fácil escalar el proyecto: es suficiente agregar
aguacorrespondiente al valor de propiedad de la periferia
Desventajas:
- Es posible cometer un error al poner la propiedad de valor en el parámetro incorrecto
- Como en el caso de la escritura directa a los registros, la portabilidad sufre
- Sobrecarga de construcción
Pudimos lograr varios objetivos establecidos, pero ¿es conveniente usarlo? Creo que no, porque para agregar otro bloque de periferia, es necesario controlar la correcta disposición de las propiedades de la clase en los parámetros de la plantilla del método.
Ideal ... casi
Para reducir la cantidad de código personalizado y las oportunidades de errores, usaremos el paquete de parámetros, que eliminará el acceso a las propiedades de las clases de periféricos en el código personalizado. Esto solo cambiará el método para habilitar el reloj:
struct Power{
template<typename... Peripherals>
  static void Enable(){
      //        |
      //    value = uart::valueAHBENR | spi::valueAHBENR  ..
    if constexpr (constexpr auto value = (Peripherals::valueAHBENR | ... ); value)
      RCC->AHBENR |= value;
    if constexpr (constexpr auto value = (Peripherals::valueAPB2ENR | ... ); value)
      RCC->APB2ENR |= value;
    if constexpr (constexpr auto value = (Peripherals::valueAPB1ENR | ... ); value)
      RCC->APB1ENR |= value;
  };
};
    …
int main(){
    //
  using uart = UART<1>;
  using spi = SPI<2>;

  Power::Enable<uart, spi>();
…
}
Tamaño del código: 36 bytes. Mira
Listado
main:
    // AHBENR( DMA1)
  ldr     r3, .L3
  ldr     r2, [r3, #20]
  orr     r2, r2, #1
  str     r2, [r3, #20]
    // APB2ENR( GPIOA, GPIOB, USART1)
  ldr     r2, [r3, #24]
  orr     r2, r2, #16384
  orr     r2, r2, #12
  str     r2, [r3, #24]
    // APB1ENR( SPI2)
  ldr     r2, [r3, #28]
  orr     r2, r2, #16384
  str     r2, [r3, #28]
En comparación con la versión anterior, la simplicidad del código de usuario ha aumentado significativamente, la probabilidad de errores se ha vuelto mínima y el consumo de memoria se ha mantenido en el mismo nivel.
Y, al parecer, puedes detenerte en esto, pero ...
Ampliando la funcionalidad
Pasemos a uno de nuestros objetivos:
Además de las capacidades básicas de habilitar y deshabilitar el reloj periférico, se requiere una funcionalidad avanzada
Supongamos que la tarea es hacer que el dispositivo tenga poca energía, y para esto, por supuesto, se requiere apagar todos los periféricos que el controlador no usa para salir del modo de ahorro de energía.
En el contexto de las condiciones expresadas al comienzo del artículo, asumiremos que USART1 será el generador del evento de activación, y que SPI2 y el puerto GPIOB correspondiente deben estar deshabilitados. En este caso, el recurso compartido DMA1 debe permanecer habilitado.
Utilizando alguna de las opciones del apartado anterior, no será posible solucionar este problema de forma eficiente y óptima y, al mismo tiempo, sin utilizar el control manual de los bloques implicados.
Por ejemplo, tomemos la última forma:
int main(){
  using uart = UART<1>;
  using spi = SPI<2>;
…
    //  USART, SPI, DMA, GPIOA, GPIOB
  Power::Enable<uart, spi>();

    // Some code

    //  SPI  GPIOB  (!)  DMA
  Power::Disable<spi>();

    //   DMA (!)  USART  GPIOA
  Power::Enable<uart>();

    // Sleep();

    //  SPI  GPIOB (!)  DMA
  Power::Enable<spi>();
…
}
Tamaño del código: 100 bytes. Mira
Listado
main:
        // AHBENR( DMA1)
        ldr     r3, .L3
        ldr     r2, [r3, #20]
        orr     r2, r2, #1
        str     r2, [r3, #20]
       // APB2ENR( GPIOA, GPIOB, USART1)
        ldr     r2, [r3, #24]
        orr     r2, r2, #16384
        orr     r2, r2, #12
        str     r2, [r3, #24]
       // APB1ENR( SPI2)
        ldr     r2, [r3, #28]
        orr     r2, r2, #16384
        str     r2, [r3, #28]
        //  SPI2
       // AHBENR( DMA1)
        ldr     r2, [r3, #20]
        bic     r2, r2, #1
        str     r2, [r3, #20]
       // APB2ENR( GPIOB)
        ldr     r2, [r3, #24]
        bic     r2, r2, #8
        str     r2, [r3, #24]
       // APB1ENR( SPI2)
        ldr     r2, [r3, #28]
        bic     r2, r2, #16384
        str     r2, [r3, #28]
        //  (!)  USART1
        // AHBENR( DMA1)
        ldr     r2, [r3, #20]
        orr     r2, r2, #1
        str     r2, [r3, #20]
       // APB2ENR( GPIOA, USART1)
        ldr     r2, [r3, #24]
        orr     r2, r2, #16384
        orr     r2, r2, #4
        str     r2, [r3, #24]
        // Sleep();
        // AHBENR( DMA1)
        ldr     r2, [r3, #20]
        orr     r2, r2, #1
        str     r2, [r3, #20]
       // APB2ENR( GPIOB)
        ldr     r2, [r3, #24]
        orr     r2, r2, #8
        str     r2, [r3, #24]
       // APB1ENR( SPI2)
        ldr     r2, [r3, #28]
        orr     r2, r2, #16384
        str     r2, [r3, #28]
Al mismo tiempo, el código de referencia en los registros tomó 68 bytes. Ver
Obviamente, para tales tareas, el obstáculo serán los recursos compartidos como DMA. Además, en este caso particular, habrá un momento en el que ambas interfaces se volverán inoperativas y, de hecho, se producirá una situación de emergencia.
Intentemos encontrar una solución ...
Estructura
Para simplificar la comprensión y el desarrollo, describiremos la estructura de tiempo general como queremos que sea:

Consta de solo cuatro bloques:
Independiente:
- IPower : una interfaz de usuario que prepara los datos para escribirlos en los registros
- Hardware : escribir valores en los registros del controlador
Depende del hardware:
- Periféricos : periféricos que se utilizan en el proyecto y le dicen a la interfaz qué dispositivos deben encenderse o apagarse.
- Adaptador : transfiere los valores que se escribirán en el hardware, indicando exactamente en qué registros se deben escribir
Interfaz IPower
Teniendo en cuenta todos los requisitos, definiremos los métodos requeridos en la interfaz:
template<typename… Peripherals>
Enable();

template<typename EnableList, typename ExceptList>
EnableExcept();

template<typename EnableList, typename DisableList>
Keep();
Habilitar : habilita los periféricos especificados en el parámetro de plantilla.
EnableExcept : habilita los periféricos especificados en el parámetro EnableList, excepto los especificados en ExceptList.
Explicación
, :
SPI2EN IOPBEN. , DMA1EN, USART1EN IOPAEN .
, :
| 0 | 0 | 0 | 0 |
| 0 | 1 | 0 | 0 |
| 1 | 0 | 1 | 0 |
| 1 | 1 | 0 | 0 |
, :
EnableExcept<spi, uart>();
SPI2EN IOPBEN. , DMA1EN, USART1EN IOPAEN .
, :
resultEnable = (enable ^ except) & enable
Estos se complementan con métodos de desactivación complementarios que hacen lo contrario.
Keep : habilita los periféricos de EnableList, deshabilita los periféricos de DisableList, mientras que si los periféricos están presentes en ambas listas, entonces conserva su estado.
Explicación
, :
SPI2EN IOPBEN, USART1EN IOPAEN , DMA1EN .
, :
| 0 | 0 | 0 | 0 |
| 0 | 1 | 0 | 1 |
| 1 | 0 | 1 | 0 |
| 1 | 1 | 0 | 0 |
, :
Keep<spi, uart>();
SPI2EN IOPBEN, USART1EN IOPAEN , DMA1EN .
, :
resultEnable = (enable ^ disable) & enable
resultDisable = (enable ^ disable) & disable
Los métodos on / off ya se han implementado bastante bien con la expresión de plegado, pero ¿qué pasa con el resto?
Si nos limitamos a utilizar 2 tipos de periferia, como se hace en la explicación, entonces no surgirán dificultades. Sin embargo, cuando un proyecto usa muchos dispositivos periféricos diferentes, surge un problema: no puede usar explícitamente más de un paquete de parámetros en una plantilla, ya que el compilador no podrá determinar dónde termina uno y comienza el segundo:
template<typename… EnableList, typename… ExceptList>
EnableExcept(){…};
  //     EnableList   ExceptList
EnableExcept<spi2, pin3, uart1, pin1, i2c3>();
Sería posible crear una clase contenedora separada para la periferia y pasarla al método:
template<typename… Peripherals>
PowerWrap{
  static constexpr auto valueAHBENR = (Peripherals::valueAHBENR | …);
  static constexpr auto valueAPB1ENR = (Peripherals:: valueAPB1ENR | …);
  static constexpr auto valueAPB2ENR = (Peripherals:: valueAPB2ENR | …);
};

using EnableList = PowerWrap<spi2, uart1>;
using ExceptList = PowerWrap<pin1, i2c1>;

EnableExcept<EnableList, ExceptList>();
Pero incluso en este caso, la interfaz quedará rígidamente ligada al número de registros, por lo tanto, para cada tipo de controlador será necesario escribir su propia clase separada, con muchas operaciones del mismo tipo y sin la posibilidad de dividirse en capas abstractas.
Dado que todos los periféricos y registros de reloj utilizados se conocen en la etapa de compilación, la tarea se puede resolver mediante metaprogramación.
Metaprogramación
Debido a que la metaprogramación se basa en trabajar no con tipos ordinarios, sino con sus listas, definiremos dos entidades que operarán con parámetros típicos y atípicos:
template<typename... Types>
struct Typelist{};

template<auto... Values>
struct Valuelist{};
…
using listT = Typelist<char, int> ;//     char  int
…
using listV = Valuelist<8,9,5,11> ;//   4
Antes de hacer algo útil con estas listas, necesitamos implementar algunas operaciones básicas que permitirán realizar acciones más complejas.
1. Recuperar el primer elemento de la lista
frente
  //
template<typename List>
struct front;

  //
  //
template<typename Head, typename... Tail>
struct front<Typelist<Head, Tail...>>{
    //
  using type = Head;
};

 //
template<auto Head, auto... Tail>
struct front<Valuelist<Head, Tail...>> {
  //
  static constexpr auto value = Head;
};

  //
template<typename List>
using front_t = typename front<List>::type;

template<typename List>
static constexpr auto front_v = front<List>::value;

  //
using listT = Typelist<char, bool, int>;
using type = front_t<listT>; // type = char

using listV = Valuelist<9,8,7>;
constexpr auto value = front_v<listV>; //value = 9
2. Eliminar el primer elemento de la lista
pop_front
template<typename List>
struct pop_front;

  //
  //
template<typename Head, typename... Tail>
struct pop_front<Typelist<Head, Tail...>> {
  //  ,
  using type = Typelist<Tail...>;
};

template<auto Head, auto... Tail>
struct pop_front<Valuelist<Head, Tail...>> {
  using type = Valuelist<Tail...>;
};

template<typename List>
using pop_front_t = typename pop_front<List>::type;

 //
using listT = Typelist<char, bool, int>;
using typeT = pop_front_t<listT>; // type = Typelist<bool, int>

using listV = Valuelist<9,8,7>;
using typeV = pop_front_t<listV>; // type = Valuelist<8,7>
3. Agregar un elemento al principio de la lista
push_front
template<typename List, typename NewElement>
struct push_front;

template<typename... List, typename NewElement>
struct push_front<Typelist<List...>, NewElement> {
  using type = Typelist<NewElement, List...>;
};

template<typename List, typename NewElement>
using push_front_t = typename push_front<List, NewElement>::type;

  //
using listT = Typelist<char, bool, int>;
using typeT = push_front_t<listT, long >; // type = Typelist<long, char, bool, int>
4. Agregar un parámetro no típico al final de la lista
push_back_value
template<typename List, auto NewElement>
struct push_back;

template<auto... List, auto NewElement>
struct push_back<Valuelist<List...>, NewElement>{
  using type = Valuelist<List..., NewElement>;
};

template<typename List, auto NewElement>
using push_back_t = typename push_back<List, NewElement>::type;

  //
using listV = Valuelist<9,8,7>;
using typeV = push_back_t<listV, 6>; // typeV = Valuelist<9,8,7,6>
5. Verificando que la lista no esté vacía
esta vacio
template<typename List>
struct is_empty{
    static constexpr auto value = false;
};

 //    ,
template<>
struct is_empty<Typelist<>>{
    static constexpr auto value = true;
};

template<typename List>
static constexpr auto is_empty_v = is_empty<List>::value;

 //
using listT = Typelist<char, bool, int>;
constexpr auto value = is_empty_v<listT>; // value = false
6. Encontrar el número de elementos en la lista
size_of_list
  //        ,
  //   count,       2
template<typename List, std::size_t count = 0>
struct size_of_list : public size_of_list<pop_front_t<List>, count + 1>{};

  //
template<std::size_t count>
struct size_of_list<Typelist<>, count>{
  static constexpr std::size_t value = count;
};

  //
template<std::size_t count>
struct size_of_list<Valuelist<>, count>{
  static constexpr std::size_t value = count;
};

template<typename List>
static constexpr std::size_t size_of_list_v = size_of_list<List>::value;

  //
using listT = Typelist<char, bool, int>;
constexpr auto value = size_of_list_v <listT>; // value = 3
Ahora que todas las acciones básicas están definidas, puede pasar a escribir metafunciones para operaciones bit a bit: o , y , xor , que son necesarias para los métodos de interfaz.
Dado que estas transformaciones de bits son del mismo tipo, intentaremos que la implementación sea lo más general posible para evitar la duplicación de código.
Una función que realiza una operación abstracta en una lista.
operaciones_listas
Lists – , , .
operation – , 2 Lists .
isEnd – , Lists.
(1) Lists 1 , (2).
– (3) (4) Lists, (6). (7) , (6), (5) Lists. (1).
template<template<typename first, typename second> class operation,
         typename Lists, bool isEnd = size_of_list_v<Lists> == 1>
class lists_operation{

  using first = front_t<Lists>; // (3)
  using second = front_t<pop_front_t<Lists>>; // (4)
  using next = pop_front_t<pop_front_t<Lists>>; // (5)
  using result = operation<first, second>; // (6)

public:

  using type = typename
      lists_operation<operation, push_front_t<next, result>>::type; // (7)

};

template<template<typename first, typename second> class operation, typename List>
class lists_operation<operation, List, true>{ // (1)
public:
  using type = front_t<List>; // (2)
};
Lists – , , .
operation – , 2 Lists .
isEnd – , Lists.
(1) Lists 1 , (2).
– (3) (4) Lists, (6). (7) , (6), (5) Lists. (1).
A continuación, implementaremos la operación para la metafunción anterior, que realizará acciones abstractas término por término sobre parámetros atípicos de dos listas:
valuelists_operation
List1 List2 – , .
operation – , .
Result – , .
(1), , Result.
(2) Result (3). (4) , .
template<template <auto value1, auto value2> typename operation,
         typename List1, typename List2, typename Result = Valuelist<>>
struct operation_2_termwise_valuelists{
  constexpr static auto newValue =
      operation<front_v<List1>, front_v<List2>>::value; // (2)

  using nextList1 = pop_front_t<List1>;
  using nextList2 = pop_front_t<List2>;

  using result = push_back_value_t<Result, newValue>; // (3)
  using type = typename
      operation_2_termwise_valuelists <operation, nextList1, nextList2, result>::type; // (4)
};

template<template <auto value1, auto value2> typename operation, typename Result>
struct operation_2_termwise_valuelists <operation, Valuelist<>, Valuelist<>, Result>{ // (1)
  using type = Result;
};
List1 List2 – , .
operation – , .
Result – , .
(1), , Result.
(2) Result (3). (4) , .
Funciones de operación de bits:
bitwise_operation
template<auto value1, auto value2>
struct and_operation{ static constexpr auto value = value1 & value2;};

template<auto value1, auto value2>
struct or_operation{ static constexpr auto value = value1 | value2;};

template<auto value1, auto value2>
struct xor_operation{ static constexpr auto value = value1 ^ value2;};
Queda por crear alias para facilitar su uso:
alias
( ).
  //       2
template<typename List1, typename List2>
using operation_and_termwise_t = typename
          operation_2_termwise_valuelists<and_operation, List1, List2>::type;

template<typename List1, typename List2>
using operation_or_termwise_t = typename
          operation_2_termwise_valuelists<or_operation, List1, List2>::type;

template<typename List1, typename List2>
using operation_xor_termwise_t = typename
          operation_2_termwise_valuelists<xor_operation, List1, List2>::type;

  //
template<typename... Lists>
using lists_termwise_and_t = typename
          lists_operation<operation_and_termwise_t, Typelist<Lists...>>::type;

template<typename... Lists>
using lists_termwise_or_t= typename
          lists_operation<operation_or_termwise_t, Typelist<Lists...>>::type;

template<typename... Lists>
using lists_termwise_xor_t = typename
          lists_operation<operation_xor_termwise_t, Typelist<Lists...>>::type;
( ).
Volviendo a la implementación de la interfaz
Dado que tanto el controlador como los periféricos utilizados se conocen en la etapa de compilación, la elección lógica para la implementación de la interfaz es el polimorfismo estático con el lenguaje CRTP . Como parámetro de plantilla, una interfaz toma una clase de adaptador de un controlador específico, que, a su vez, hereda de esta interfaz.
template<typename adapter>
struct IPower{

  template<typename... Peripherals>
  static void Enable(){

      //    ,   ‘power’
      //
    using tEnableList = lists_termwise_or_t<typename Peripherals::power...>;

      //  Valuelist<…>,   0,
      //
    using tDisableList = typename adapter::template fromValues<>::power;

      //   /
  adapter:: template _Set<tEnableList , tDisableList>();
  }

  template<typename EnableList, typename ExceptList>
  static void EnableExcept(){

    using tXORedList = lists_termwise_xor_t <
        typename EnableList::power, typename ExceptList::power>;

    using tEnableList = lists_termwise_and_t <
        typename EnableList::power, tXORedList>;

    using tDisableList = typename adapter::template fromValues<>::power;

    adapter:: template _Set<tEnableList , tDisableList>();
  }

  template<typename EnableList, typename DisableList>
    static void Keep(){

    using tXORedList = lists_termwise_xor_t <
        typename EnableList::power, typename DisableList::power>;

    using tEnableList = lists_termwise_and_t <
        typename EnableList::power, tXORedList>;

    using tDisableList = lists_termwise_and_t <
        typename DisableList::power, tXORedList>;

    adapter:: template _Set<tEnableList , tDisableList>();
  }

  template<typename... PeripheralsList>
  struct fromPeripherals{
    using power = lists_termwise_or_t<typename PeripheralsList::power...>;
  };

};
Además, la interfaz contiene una clase fromPeripherals incorporada que le permite combinar periféricos en una lista, que luego se puede usar en los métodos:
  using listPower = Power::fromPeripherals<spi, uart>;

  Power::Enable<listPower>();
Los métodos de desactivación se implementan de manera similar.
Adaptador de controlador
En la clase del adaptador, debe establecer las direcciones de los registros de reloj y determinar la secuencia en la que escribir en ellos, y luego transferir el control directamente a la clase, que establecerá o borrará los bits de los registros indicados.
struct Power: public IPower<Power>{

  static constexpr uint32_t
    _addressAHBENR  = 0x40021014,
    _addressAPB2ENR = 0x40021018,
    _addressAPB1ENR = 0x4002101C;

  using AddressesList = Valuelist<
      _addressAHBENR, _addressAPB1ENR, _addressAPB2ENR>;

  template<typename EnableList, typename DisableList>
  static void _Set(){
    //   ,
    HPower:: template ModifyRegisters<EnableList, DisableList, AddressesList>();
  }

  template<uint32_t valueAHBENR = 0, uint32_t valueAPB1ENR = 0, uint32_t valueAPB2ENR = 0>
  struct fromValues{
    using power = Valuelist<valueAHBENR, valueAPB1ENR, valueAPB2ENR>;
  };

};
Periferia
Damos a la periferia una propiedad de potencia utilizando la estructura fromValues del adaptador:
template<int identifier>
struct SPI{
  //   identifier
  using power = Power::fromValues<
      RCC_AHBENR_DMA1EN, //    ,
      RCC_APB1ENR_SPI2EN, //
      RCC_APB2ENR_IOPBEN>::power;
};

template<int identifier>
struct UART{
  using power = Power::fromValues<
      RCC_AHBENR_DMA1EN,
      0U,
      RCC_APB2ENR_USART1EN | RCC_APB2ENR_IOPAEN>::power;
};
Escribiendo en registros
La clase consta de un método de plantilla recursivo cuya tarea es escribir valores en los registros del controlador pasados por el adaptador.
El método acepta 3 listas de parámetros de Valuelist <…> no típicos como parámetros :
- SetList y ResetList : listas de secuencias de valores de bits para establecer / restablecer en un registro
- AddressesList : una lista de direcciones de registro en las que se escribirán los valores de los parámetros anteriores
struct HPower{

  template<typename SetList, typename ResetList, typename AddressesList>
    static void ModifyRegisters(){
    if constexpr (!is_empty_v<SetList> && !is_empty_v<ResetList> &&
		  !is_empty_v<AddressesList>){

        //
      constexpr auto valueSet = front_v<SetList>;
      constexpr auto valueReset = front_v<ResetList>;

      if constexpr(valueSet || valueReset){

        constexpr auto address = front_v<AddressesList>;
        using pRegister_t = volatile std::remove_const_t<decltype(address)>* const;
        auto& reg = *reinterpret_cast<pRegister_t>(address);

        // (!)  ,
        reg = (reg &(~valueReset)) | valueSet;
      }

        //
      using tRestSet = pop_front_t<SetList>;
      using tRestReset = pop_front_t<ResetList>;
      using tRestAddress = pop_front_t<AddressesList>;

        //    ,
      ModifyRegisters<tRestSet, tRestReset, tRestAddress>();
    }
  };

};
La clase contiene la única línea de código que se incluirá en la lista de ensamblado.
Ahora que todos los bloques de la estructura están listos, pasemos a las pruebas.
Probando el código
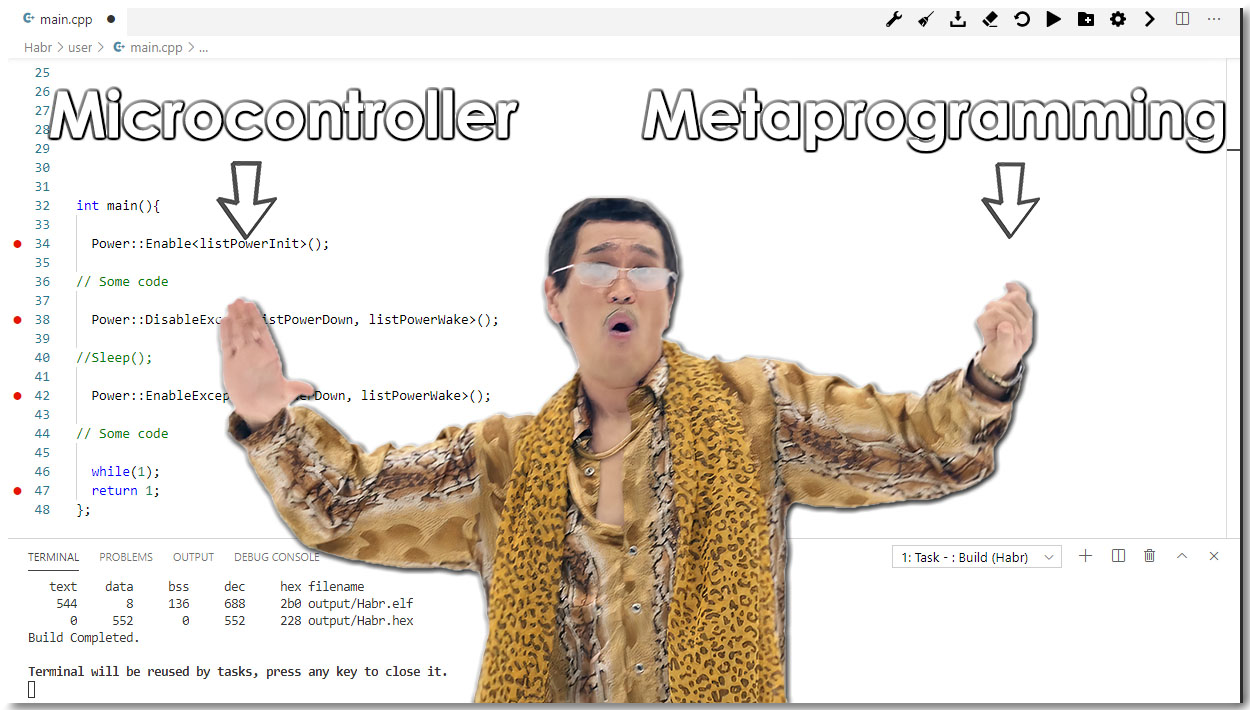
Recordemos las condiciones del último problema:
- Habilitación de SPI2 y USART1
- Apagar SPI2 antes de ingresar al "modo de ahorro de energía"
- Habilitación de SPI2 después de salir del "modo de ahorro de energía"
//
using spi = SPI<2>;
using uart = UART<1>;

//     ( )
using listPowerInit = Power::fromPeripherals<spi, uart>;
using listPowerDown = Power::fromPeripherals<spi>;
using listPowerWake = Power::fromPeripherals<uart>;

int main() {

   //  SPI2, UASRT1, DMA1, GPIOA, GPIOB
    Power::Enable<listPowerInit>();

    // Some code

    //   SPI2  GPIOB
    Power::DisableExcept<listPowerDown, listPowerWake>();

    //Sleep();

    //   SPI2  GPIOB
    Power::EnableExcept<listPowerDown, listPowerWake>();
…
}
Tamaño del código: 68 bytes *, como en el caso de escritura directa en registros.
Listado
main:
  // AHBENR( DMA1)
  ldr     r3, .L3
  ldr     r2, [r3, #20]
  orr     r2, r2, #1
  str     r2, [r3, #20]
  // APB1ENR( SPI2
  ldr     r2, [r3, #28]
  orr     r2, r2, #16384
  str     r2, [r3, #28]
  // APB2ENR( GPIOA, GPIOB, USART1)
  ldr     r2, [r3, #24]
  orr     r2, r2, #16384
  orr     r2, r2, #12
  str     r2, [r3, #24]
  // APB1ENR( SPI2)
  ldr     r2, [r3, #28]
  bic     r2, r2, #16384
  str     r2, [r3, #28]
  // APB2ENR( GPIOB)
  ldr     r2, [r3, #24]
  bic     r2, r2, #8
  str     r2, [r3, #24]
  // APB1ENR( SPI2
  ldr     r2, [r3, #28]
  orr     r2, r2, #16384
  str     r2, [r3, #28]
  // APB2ENR( GPIOB)
  ldr     r2, [r3, #24]
  orr     r2, r2, #8
  str     r2, [r3, #24]
* Con GCC 9.2.1, esto es 8 bytes más que GCC 10.1.1 . Como puede ver en la lista , se agregan varias instrucciones innecesarias, por ejemplo, antes de leer a la dirección ( ldr ) hay una instrucción de agregar ( agrega ), aunque estas instrucciones se pueden reemplazar con una lectura con un desplazamiento. La nueva versión optimiza estas operaciones. Al mismo tiempo, clang genera los mismos listados.
Salir
Se han logrado los objetivos establecidos al comienzo del artículo: la velocidad de ejecución y la eficiencia se han mantenido al nivel de escritura directa en el registro, la probabilidad de un error en el código de usuario se minimiza.
Quizás el volumen del código fuente y la complejidad del desarrollo parecerán redundantes, sin embargo, gracias a tal cantidad de abstracciones, la transición a un nuevo controlador requerirá un mínimo de esfuerzo: 30 líneas de código adaptador comprensible + 5 líneas por unidad periférica.
Código completo
type_traits_custom.hpp
#ifndef _TYPE_TRAITS_CUSTOM_HPP
#define _TYPE_TRAITS_CUSTOM_HPP

#include <type_traits>

/*!
  @file
  @brief Traits for metaprogramming
*/

/*!
  @brief Namespace for utils.
*/
namespace utils{

/*-----------------------------------Basic----------------------------------------*/

/*!
  @brief Basic list of types
  @tparam Types parameter pack
*/
template<typename... Types>
struct Typelist{};

/*!
  @brief Basic list of values
  @tparam Values parameter pack
*/
template<auto... Values>
struct Valuelist{};

/*------------------------------End of Basic--------------------------------------*/

/*----------------------------------Front-------------------------------------------
  Description:  Pop front type or value from list

  using listOfTypes = Typelist<int, short, bool, unsigned>;
  using listOfValues = Valuelist<1,2,3,4,5,6,1>;

  |-----------------|--------------------|----------|
  |      Trait      |    Parameters      |  Result  |
  |-----------------|--------------------|----------|
  |     front_t     |   <listOfTypes>    |    int   |
  |-----------------|--------------------|----------|
  |     front_v     |   <listOfValues>   |     1    |
  |-----------------|--------------------|----------| */

namespace{

template<typename List>
struct front;

template<typename Head, typename... Tail>
struct front<Typelist<Head, Tail...>>{
  using type = Head;
};

template<auto Head, auto... Tail>
struct front<Valuelist<Head, Tail...>> {
  static constexpr auto value = Head;
};

}

template<typename List>
using front_t = typename front<List>::type;

template<typename List>
static constexpr auto front_v = front<List>::value;

/*----------------------------------End of Front----------------------------------*/

/*----------------------------------Pop_Front---------------------------------------
  Description:  Pop front type or value from list and return rest of the list

  using listOfTypes = Typelist<int, short, bool>;
  using listOfValues = Valuelist<1,2,3,4,5,6,1>;

  |-----------------|--------------------|------------------------|
  |      Trait      |    Parameters      |         Result         |
  |-----------------|--------------------|------------------------|
  |   pop_front_t   |    <listOfTypes>   | Typelist<short, bool>  |
  |-----------------|--------------------|------------------------|
  |   pop_front_t   |   <listOfValues>   | Valuelist<2,3,4,5,6,1> |
  |-----------------|--------------------|------------------------| */

namespace{

template<typename List>
struct pop_front;

template<typename Head, typename... Tail>
struct pop_front<Typelist<Head, Tail...>> {
  using type = Typelist<Tail...>;
};

template<auto Head, auto... Tail>
struct pop_front<Valuelist<Head, Tail...>> {
  using type = Valuelist<Tail...>;
};

}

template<typename List>
using pop_front_t = typename pop_front<List>::type;

/*------------------------------End of Pop_Front----------------------------------*/

/*----------------------------------Push_Front--------------------------------------
  Description:  Push new element to front of the list

  using listOfTypes = Typelist<short, bool>;

  |-----------------------|--------------------------|-------------------------------|
  |      Trait            |        Parameters        |             Result            |
  |-----------------------|--------------------------|-------------------------------|
  |      push_front_t     |   <listOfTypes, float>   | Typelist<float, short, bool>  |
  |-----------------------|--------------------------|-------------------------------| */

namespace{

template<typename List, typename NewElement>
struct push_front;

template<typename... List, typename NewElement>
struct push_front<Typelist<List...>, NewElement> {
  using type = Typelist<NewElement, List...>;
};

}

template<typename List, typename NewElement>
using push_front_t = typename push_front<List, NewElement>::type;

/*------------------------------End of Push_Front---------------------------------*/

/*----------------------------------Push_Back---------------------------------------
  Description:  Push new value to back of the list

  using listOfValues = Valuelist<1,2,3,4,5,6>;

  |-----------------------|--------------------------|-------------------------------|
  |      Trait            |        Parameters        |             Result            |
  |-----------------------|--------------------------|-------------------------------|
  |   push_back_value_t   |     <listOfValues, 0>    |    Valuelist<1,2,3,4,5,6,0>   |
  |-----------------------|--------------------------|-------------------------------| */

namespace{

template<typename List, auto NewElement>
struct push_back_value;

template<auto... List, auto NewElement>
struct push_back_value<Valuelist<List...>, NewElement>{
  using type = Valuelist<List..., NewElement>;
};

}

template<typename List, auto NewElement>
using push_back_value_t = typename push_back_value<List, NewElement>::type;

/*----------------------------------End of Push_Back------------------------------*/

/*-----------------------------------Is_Empty---------------------------------------
  Description:  Check parameters list for empty and return bool value

  using listOfTypes = Typelist<int, short, bool, unsigned>;
  using listOfValues = Valuelist<>;

  |-------------------------|--------------------|----------|
  |          Trait          |     Parameters     |  Result  |
  |-------------------------|--------------------|----------|
  |        is_empty_v       |    <listOfTypes>   |  false   |
  |-------------------------|--------------------|----------|
  |        is_empty_v       |   <listOfValues>   |   true   |
  |-------------------------|--------------------|----------| */

namespace{
/*!
  @brief Check the emptiness of the types in parameters.   \n
    E.g.: is_empty<int, short, bool>::value;
*/
template<typename List>
struct is_empty{
    static constexpr auto value = false;
};

/*!
  @brief Check the emptiness of the types in parameter. Specializatio for empty parameters   \n
    E.g.: is_empty<>::value;
*/
template<>
struct is_empty<Typelist<>>{
    static constexpr auto value = true;
};

template<>
struct is_empty<Valuelist<>>{
    static constexpr auto value = true;
};

}

/*!
  @brief Check the emptiness of the types-list in parameter.   \n
    E.g.: using list = Typelist<int, short, bool>; is_empty_v<list>;
*/
template<typename List>
static constexpr auto is_empty_v = is_empty<List>::value;

/*--------------------------------End of Is_Empty---------------------------------*/

/*---------------------------------Size_Of_List-------------------------------------
  Description:  Return number of elements in list

  using listOfTypes = Typelist<int, float, double, bool>;

  |------------------|--------------------|----------|
  |       Trait      |     Parameters     |  Result  |
  |------------------|--------------------|----------|
  |  size_of_list_v  |     listOfTypes    |    4     |
  |------------------|--------------------|----------| */

namespace{

template<typename List, std::size_t count = 0U>
struct size_of_list : public size_of_list<pop_front_t<List>, count + 1>{};

template<std::size_t count>
struct size_of_list<Typelist<>, count>{
  static constexpr std::size_t value = count;
};

template<std::size_t count>
struct size_of_list<Valuelist<>, count>{
  static constexpr std::size_t value = count;
};

}

template<typename List>
static constexpr std::size_t size_of_list_v = size_of_list<List>::value;

/*-------------------------------End Size_Of_List---------------------------------*/

/*---------------------------------Lists Operation--------------------------------*/

  /*Description: Operations with lists of values

  using list1 = Valuelist<1, 4, 8, 16>;
  using list2 = Valuelist<1, 5, 96, 17>;

  |------------------------------|-------------------|---------------------------|
  |               Trait          |    Parameters     |           Result          |
  |------------------------------|-------------------|---------------------------|
  |     lists_termwise_and_t     |  <list1, list2>   |  Valuelist<1, 4, 0, 16>   |
  |------------------------------|-------------------|---------------------------|
  |     lists_termwise_or_t      |  <list1, list2>   |  Valuelist<1, 5, 104, 17> |
  |---------------------------- -|-------------------|---------------------------|
  |     lists_termwise_xor_t     |  <list1, list2>   |  Valuelist<0, 1, 104, 1>  |
  |------------------------------|-------------------|---------------------------| */

namespace{

template<template <auto value1, auto value2> typename operation,
         typename List1, typename List2, typename Result = Valuelist<>>
struct operation_2_termwise_valuelists{
  constexpr static auto newValue = operation<front_v<List1>, front_v<List2>>::value;
  using nextList1 = pop_front_t<List1>;
  using nextList2 = pop_front_t<List2>;

  using result = push_back_value_t<Result, newValue>;
  using type = typename
      operation_2_termwise_valuelists<operation, nextList1, nextList2, result>::type;
};

template<template <auto value1, auto value2> typename operation, typename Result>
struct operation_2_termwise_valuelists<operation, Valuelist<>, Valuelist<>, Result>{
  using type = Result;
};

template<template <auto value1, auto value2> typename operation,
         typename List2, typename Result>
struct operation_2_termwise_valuelists<operation, Valuelist<>, List2, Result>{
  using type = typename
      operation_2_termwise_valuelists<operation, Valuelist<0>, List2, Result>::type;
};

template<template <auto value1, auto value2> typename operation,
         typename List1, typename Result>
struct operation_2_termwise_valuelists<operation, List1, Valuelist<>, Result>{
  using type = typename
      operation_2_termwise_valuelists<operation, List1, Valuelist<0>, Result>::type;
};

template<template<typename first, typename second> class operation,
         typename Lists, bool isEnd = size_of_list_v<Lists> == 1>
class lists_operation{

  using first = front_t<Lists>;
  using second = front_t<pop_front_t<Lists>>;
  using next = pop_front_t<pop_front_t<Lists>>;
  using result = operation<first, second>;

public:

  using type = typename lists_operation<operation, push_front_t<next, result>>::type;

};

template<template<typename first, typename second> class operation,
         typename Lists>
class lists_operation<operation, Lists, true>{
public:
  using type = front_t<Lists>;
};

template<auto value1, auto value2>
struct and_operation{ static constexpr auto value = value1 & value2;};

template<auto value1, auto value2>
struct or_operation{ static constexpr auto value = value1 | value2;};

template<auto value1, auto value2>
struct xor_operation{ static constexpr auto value = value1 ^ value2;};

template<typename List1, typename List2>
using operation_and_termwise_t = typename
    operation_2_termwise_valuelists<and_operation, List1, List2>::type;

template<typename List1, typename List2>
using operation_or_termwise_t = typename
    operation_2_termwise_valuelists<or_operation, List1, List2>::type;

template<typename List1, typename List2>
using operation_xor_termwise_t = typename
    operation_2_termwise_valuelists<xor_operation, List1, List2>::type;

}

template<typename... Lists>
using lists_termwise_and_t =
    typename lists_operation<operation_and_termwise_t, Typelist<Lists...>>::type;

template<typename... Lists>
using lists_termwise_or_t = typename
    lists_operation<operation_or_termwise_t, Typelist<Lists...>>::type;

template<typename... Lists>
using lists_termwise_xor_t = typename
    lists_operation<operation_xor_termwise_t, Typelist<Lists...>>::type;

/*--------------------------------End of Lists Operation----------------------------*/

} // !namespace utils

#endif //!_TYPE_TRAITS_CUSTOM_HPP
IPower.hpp
#ifndef _IPOWER_HPP
#define _IPOWER_HPP

#include "type_traits_custom.hpp"

#define __FORCE_INLINE __attribute__((always_inline)) inline

/*!
  @brief Controller's peripherals interfaces
*/
namespace controller::interfaces{

/*!
  @brief Interface for Power(Clock control). Static class. CRT pattern
  @tparam <adapter> class of specific controller
*/
template<typename adapter>
class IPower{

  IPower() = delete;

public:

  /*!
    @brief Enables peripherals Power(Clock)
    @tparam <Peripherals> list of peripherals with trait 'power'
  */
  template<typename... Peripherals>
  __FORCE_INLINE static void Enable(){
    using tEnableList = utils::lists_termwise_or_t<typename Peripherals::power...>;
    using tDisableList = typename adapter::template fromValues<>::power;
   adapter:: template _Set<tEnableList, tDisableList>();
  }

  /*!
    @brief Enables Power(Clock) except listed peripherals in 'ExceptList'.
      If Enable = Exception = 1, then Enable = 0, otherwise depends on Enable.
    @tparam <EnableList> list to enable, with trait 'power'
    @tparam <ExceptList> list of exception, with trait 'power'
  */
  template<typename EnableList, typename ExceptList>
  __FORCE_INLINE static void EnableExcept(){
    using tXORedList = utils::lists_termwise_xor_t<typename EnableList::power, typename ExceptList::power>;
    using tEnableList = utils::lists_termwise_and_t<typename EnableList::power, tXORedList>;
    using tDisableList = typename adapter::template fromValues<>::power;
    adapter:: template _Set<tEnableList, tDisableList>();
  }

  /*!
    @brief Disables peripherals Power(Clock)
    @tparam <Peripherals> list of peripherals with trait 'power'
  */
  template<typename... Peripherals>
  __FORCE_INLINE static void Disable(){
    using tDisableList = utils::lists_termwise_or_t<typename Peripherals::power...>;
    using tEnableList = typename adapter::template fromValues<>::power;
    adapter:: template _Set<tEnableList, tDisableList>();
  }

  /*!
    @brief Disables Power(Clock) except listed peripherals in 'ExceptList'.
      If Disable = Exception = 1, then Disable = 0, otherwise depends on Disable.
    @tparam <DisableList> list to disable, with trait 'power'
    @tparam <ExceptList> list of exception, with trait 'power'
  */
  template<typename DisableList, typename ExceptList>
  __FORCE_INLINE static void DisableExcept(){
    using tXORedList = utils::lists_termwise_xor_t<typename DisableList::power, typename ExceptList::power>;
    using tDisableList = utils::lists_termwise_and_t<typename DisableList::power, tXORedList>;
    using tEnableList = typename adapter::template fromValues<>::power;
    adapter:: template _Set<tEnableList, tDisableList>();
  }

  /*!
    @brief Disable and Enables Power(Clock) depends on values.
      If Enable = Disable = 1, then Enable = Disable = 0, otherwise depends on values
    @tparam <EnableList> list to enable, with trait 'power'
    @tparam <DisableList> list to disable, with trait 'power'
  */
  template<typename EnableList, typename DisableList>
  __FORCE_INLINE static void Keep(){
    using tXORedList = utils::lists_termwise_xor_t<typename EnableList::power, typename DisableList::power>;
    using tEnableList = utils::lists_termwise_and_t<typename EnableList::power, tXORedList>;
    using tDisableList = utils::lists_termwise_and_t<typename DisableList::power, tXORedList>;
    adapter:: template _Set<tEnableList, tDisableList>();
  }

  /*!
    @brief Creates custom 'power' list from peripherals. Peripheral driver should implement 'power' trait.
      E.g.: using power = Power::makeFromValues<1, 512, 8>::power;
    @tparam <PeripheralsList> list of peripherals with trait 'power'
  */
 template<typename... PeripheralsList>
  class fromPeripherals{
    fromPeripherals() = delete;
    using power = utils::lists_termwise_or_t<typename PeripheralsList::power...>;
    friend class IPower<adapter>;
  };

};

} // !namespace controller::interfaces

#undef   __FORCE_INLINE

#endif // !_IPOWER_HPP
HPower.hpp
#ifndef _HPOWER_HPP
#define _HPOWER_HPP

#include "type_traits_custom.hpp"

#define __FORCE_INLINE __attribute__((always_inline)) inline

/*!
  @brief Hardware operations
*/
namespace controller::hardware{

/*!
  @brief Implements hardware operations with Power(Clock) registers
*/
class HPower{

  HPower() = delete;

protected:

/*!
  @brief Set or Reset bits in the registers
  @tparam <SetList> list of values to set
  @tparam <ResetList> list of values to reset
  @tparam <AddressesList> list of registers addresses to operate
*/
  template<typename SetList, typename ResetList, typename AddressesList>
  __FORCE_INLINE static void ModifyRegisters(){
    using namespace utils;

    if constexpr (!is_empty_v<SetList> && !is_empty_v<ResetList> &&
		  !is_empty_v<AddressesList>){

      constexpr auto valueSet = front_v<SetList>;
      constexpr auto valueReset = front_v<ResetList>;

      if constexpr(valueSet || valueReset){
        constexpr auto address = front_v<AddressesList>;

        using pRegister_t = volatile std::remove_const_t<decltype(address)>* const;
        auto& reg = *reinterpret_cast<pRegister_t>(address);

        reg = (reg &(~valueReset)) | valueSet;
      }

      using tRestSet = pop_front_t<SetList>;
      using tRestReset = pop_front_t<ResetList>;
      using tRestAddress = pop_front_t<AddressesList>;

      ModifyRegisters<tRestSet, tRestReset, tRestAddress>();
    }
  };

};

} // !namespace controller::hardware

#undef __FORCE_INLINE

#endif // !_HPOWER_HPP
stm32f1_Power.hpp
#ifndef _STM32F1_POWER_HPP
#define _STM32F1_POWER_HPP

#include <cstdint>
#include "IPower.hpp"
#include "HPower.hpp"
#include "type_traits_custom.hpp"

#define __FORCE_INLINE __attribute__((always_inline)) inline

/*!
  @brief Controller's peripherals
*/
namespace controller{

/*!
  @brief Power managment for controller
*/
class Power: public interfaces::IPower<Power>, public hardware::HPower{

  Power() = delete;

public:

  /*!
    @brief Creates custom 'power' list from values. Peripheral driver should implement 'power' trait.
      E.g.: using power = Power::fromValues<1, 512, 8>::power;
    @tparam <valueAHB=0> value for AHBENR register
    @tparam <valueAPB1=0> value for APB1ENR register
    @tparam <valueAPB2=0> value for APB1ENR register
  */
  template<uint32_t valueAHBENR = 0, uint32_t valueAPB1ENR = 0, uint32_t valueAPB2ENR = 0>
  struct fromValues{
    fromValues() = delete;
    using power = utils::Valuelist<valueAHBENR, valueAPB1ENR, valueAPB2ENR>;
  };

private:

  static constexpr uint32_t
    _addressAHBENR  = 0x40021014,
    _addressAPB2ENR = 0x40021018,
    _addressAPB1ENR = 0x4002101C;

  using AddressesList = utils::Valuelist<_addressAHBENR, _addressAPB1ENR, _addressAPB2ENR>;

  template<typename EnableList, typename DisableList>
  __FORCE_INLINE static void _Set(){
    HPower:: template ModifyRegisters<EnableList, DisableList, AddressesList>();
  }

  friend class IPower<Power>;

};

} // !namespace controller

#undef __FORCE_INLINE

#endif // !_STM32F1_POWER_HPP
stm32f1_SPI.hpp
#ifndef _STM32F1_SPI_HPP
#define _STM32F1_SPI_HPP

#include "stm32f1_Power.hpp"

namespace controller{

template<auto baseAddress>
class SPI{

  static const uint32_t RCC_AHBENR_DMA1EN = 1;
  static const uint32_t RCC_APB2ENR_IOPBEN = 8;
  static const uint32_t RCC_APB1ENR_SPI2EN = 0x4000;

  /*!
    @brief Trait for using in Power class. Consists of Valueslist with
      values for AHBENR, APB1ENR, APB2ENR registers
  */
  using power = Power::fromValues<
           RCC_AHBENR_DMA1EN,
           RCC_APB1ENR_SPI2EN,
           RCC_APB2ENR_IOPBEN>::power;

  template<typename>
  friend class interfaces::IPower;
};

}

#endif // !_STM32F1_SPI_HPP
stm32f1_UART.hpp
#ifndef _STM32F1_UART_HPP
#define _STM32F1_UART_HPP

#include "stm32f1_Power.hpp"

namespace controller{

template<auto baseAddress>
class UART{

  static const uint32_t RCC_AHBENR_DMA1EN = 1;
  static const uint32_t RCC_APB2ENR_IOPAEN = 4;
  static const uint32_t RCC_APB2ENR_USART1EN = 0x4000;

  /*!
    @brief Trait for using in Power class. Consists of Valueslist with
      values for AHBENR, APB1ENR, APB2ENR registers
  */
  using power = Power::fromValues<
           RCC_AHBENR_DMA1EN,
           0U,
           RCC_APB2ENR_USART1EN | RCC_APB2ENR_IOPAEN>::power;

  template<typename>
  friend class interfaces::IPower;
};

}

#endif // !_STM32F1_UART_HPP
main.cpp
#include "stm32f1_Power.hpp"
#include "stm32f1_UART.hpp"
#include "stm32f1_SPI.hpp"

using namespace controller;

using spi = SPI<2>;
using uart = UART<1>;

using listPowerInit = Power::fromPeripherals<spi, uart>;
using listPowerDown = Power::fromPeripherals<spi>;
using listPowerWake = Power::fromPeripherals<uart>;

int main(){

  Power::Enable<listPowerInit>();

  //Some code

  Power::DisableExcept<listPowerDown, listPowerWake>();

  //Sleep();

  Power::EnableExcept<listPowerDown, listPowerWake>();

  while(1);
  return 1;
};
Github